PROJECT: VISIT
Introduction
VISIT is a Java-based Desktop application, made for doctors as an open-source, paper-free alternative to traditional patient management systems. The workflow of the application is centralized around users who can type fast and are comfortable with Command-Line Interfaces (CLIs).
VISIT mainly allows you to add and manage patient information, visitation and appointment details among other features, maintaining the key features doctors need in a patient management system.
Originally a fork from the AddressBook3 from Team SEE-DU, my team UnrealUnity and I have developed VISIT over a period of 2 months, with the codebase currently standing around ~16k LoC in size. The following .asciidoc serves to document my various contributions to the project throughout the development of VISIT.
Summary of contributions
This section categorizes my various contributions into its relevant sections towards the development of VISIT.

Major Enhancement
Added the Profile feature to VISIT.
-
Purpose: Allows the user to visualize all attributes of a patient (Name, Address, etc.) as well as all relevant visitation reports in an easy to access Profile Panel. Profiles can also be exported into .txt files.
-
Justification: This feature greatly enhances the way Doctors visualize patient data in VISIT as detailed information is available at a single glance. This is often needed when archiving or referencing a patient’s previous details during consultation.
-
Highlights: This feature requires interacts with existing and concurrently implemented data structures of VISIT. This required deep knowledge of the existing codebase and close collaboration with other members of my team in order to ensure that the feature works seamlessly with the rest of the features in VISIT.
Minor Enhancements
-
Enhanced the intuitive use of the
findcommand to filter Patients by their names, even if the query was a partial match. -
Added a pleasant and modern landing page for GitHub repository (See README.adoc).
Code contributed
See VISIT’s RepoSense.
Other contributions:
-
Project management:
-
Managed the releases of versions
v1.1-v1.4(4 releases) of VISIT on GitHub. -
Organized and facilitated team meeting, ensuring high levels of engagement from all members.
-
Ensured production goals were met weekly by communicating constantly with individual members.
-
-
Tests:
-
Wrote additional tests to increase coverage from 62% to 66% (Pull request: #208)
-
-
Documentation:
-
Community:
-
29 PRs reviewed, example with non-trivial review comments: #55, #66, #210
-
Reported bugs and suggestions for another project using AddressBook3 as a base: EzWatchList Bug Reports
-
Contributions to the User Guide
The section below is an excerpt from VISIT’s User Guide, detailing the additions that I made to document the Profile enhancement, showcasing my ability to write documentation targeting end-users. |
Viewing and Generating a Patient’s Profile
VISIT allows you to visualize a specified patient’s full details on an easy to access panel. The command can be initiated as follows:
Format: profile INDEX
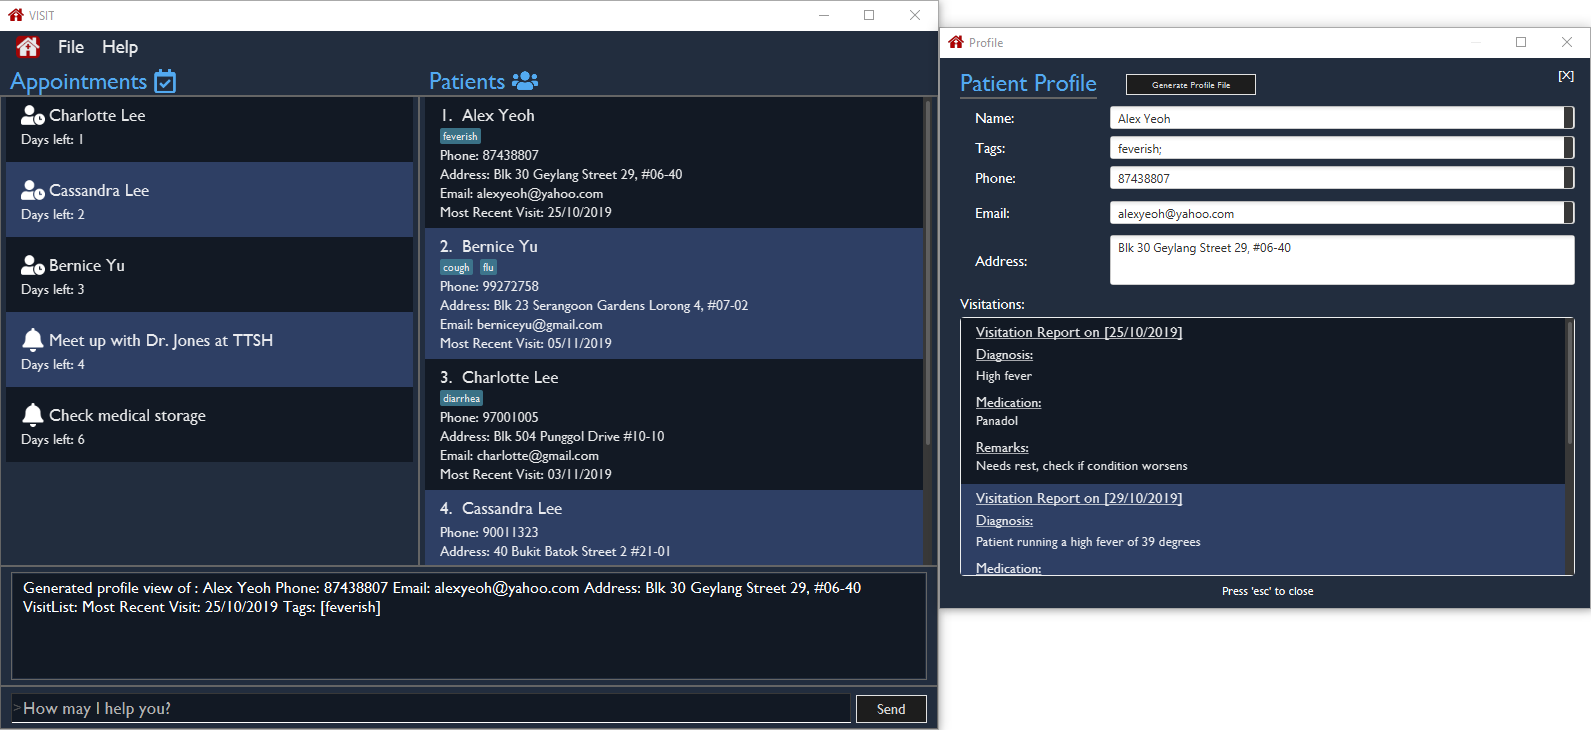
Opening a Profile Window: : profile
Step 1: Enter in profile 1 into the command bar and press Enter.

Step 2: A pop out panel will appear, detailing the various attributes of the specified Patient.
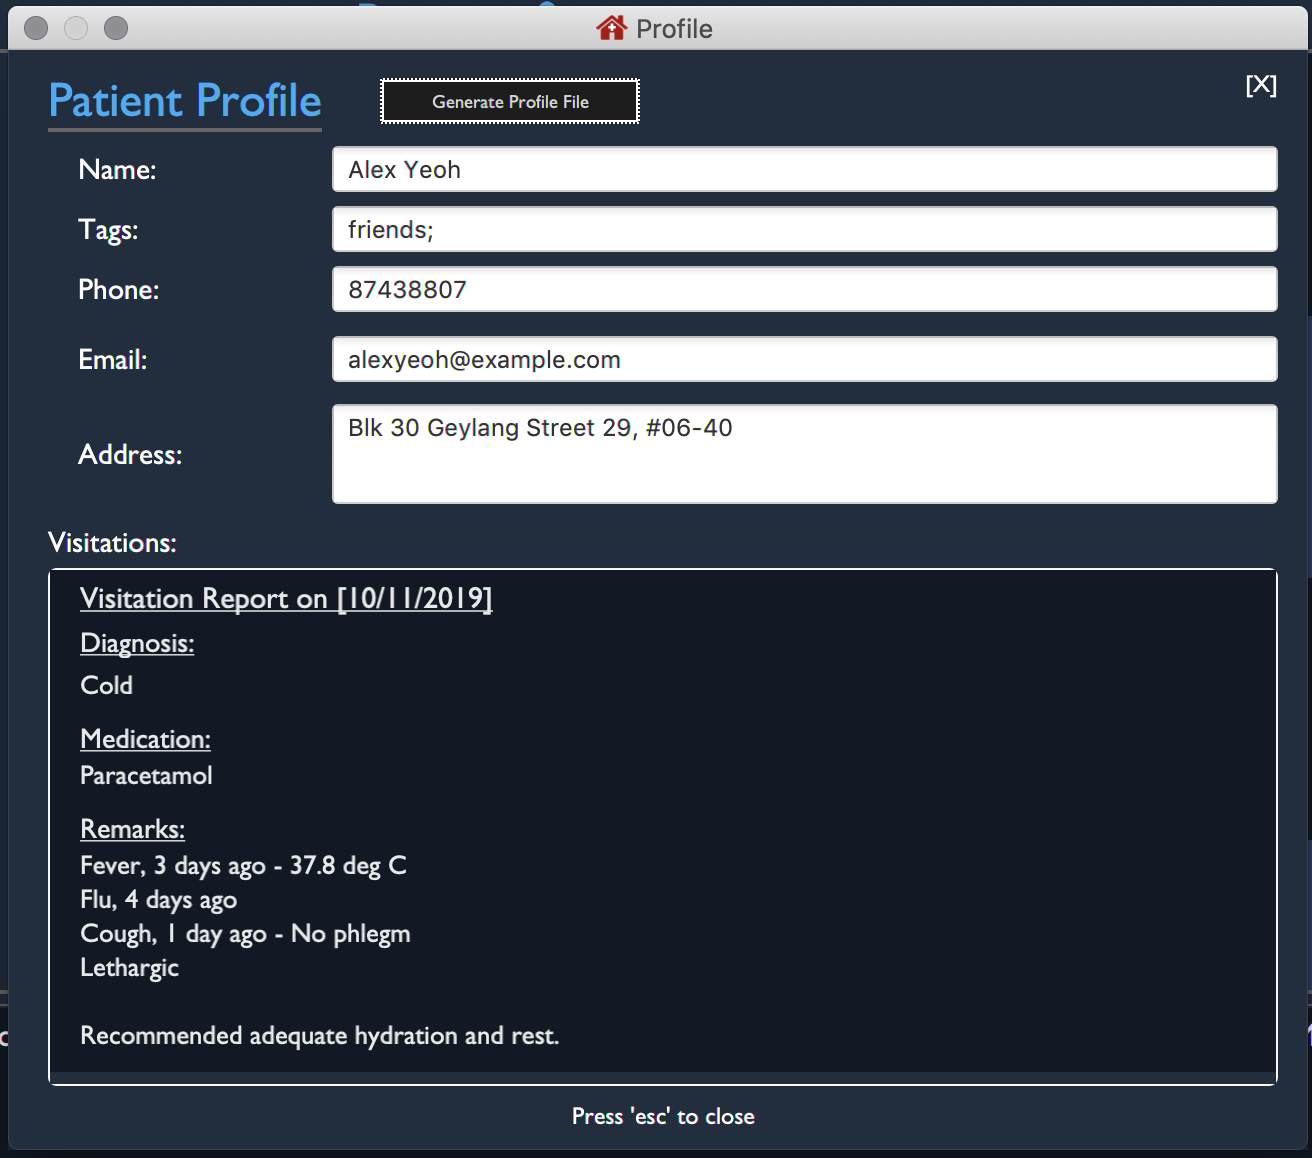
This window includes all Patient attributes and visitation records.
| You must close this window before doing anything else with VISIT (Adding Visits, Deleting Patients, etc.). |
Closing the panel
Clicking on the cross on the top-right of the panel or pressing esc button on your keyboard will close the panel.
Generating and Exporting a Profile as a .txt file
You can generate a text file containing the contents of the Patient’s Profile, for your own archiving purposes and exporting.
Step 1: Press p on your keyboard or click the Generate Profile File button.
| You will see a message saying "Profile .txt created in /generated_profiles/." once the Profile has been successfully generated. |
Step 2: Navigate to the generated_profiles folder located in the parent folder of VISITapp.jar

Step 3: Access the generated profile stored in the folder.

| The generated text file will be the following format: Name_Contact Number_Date Time.txt e.g. Alex Yeoh_87438807_02-11-2019 20-33-58.txt |
Below is an example of a generated profile .txt file:
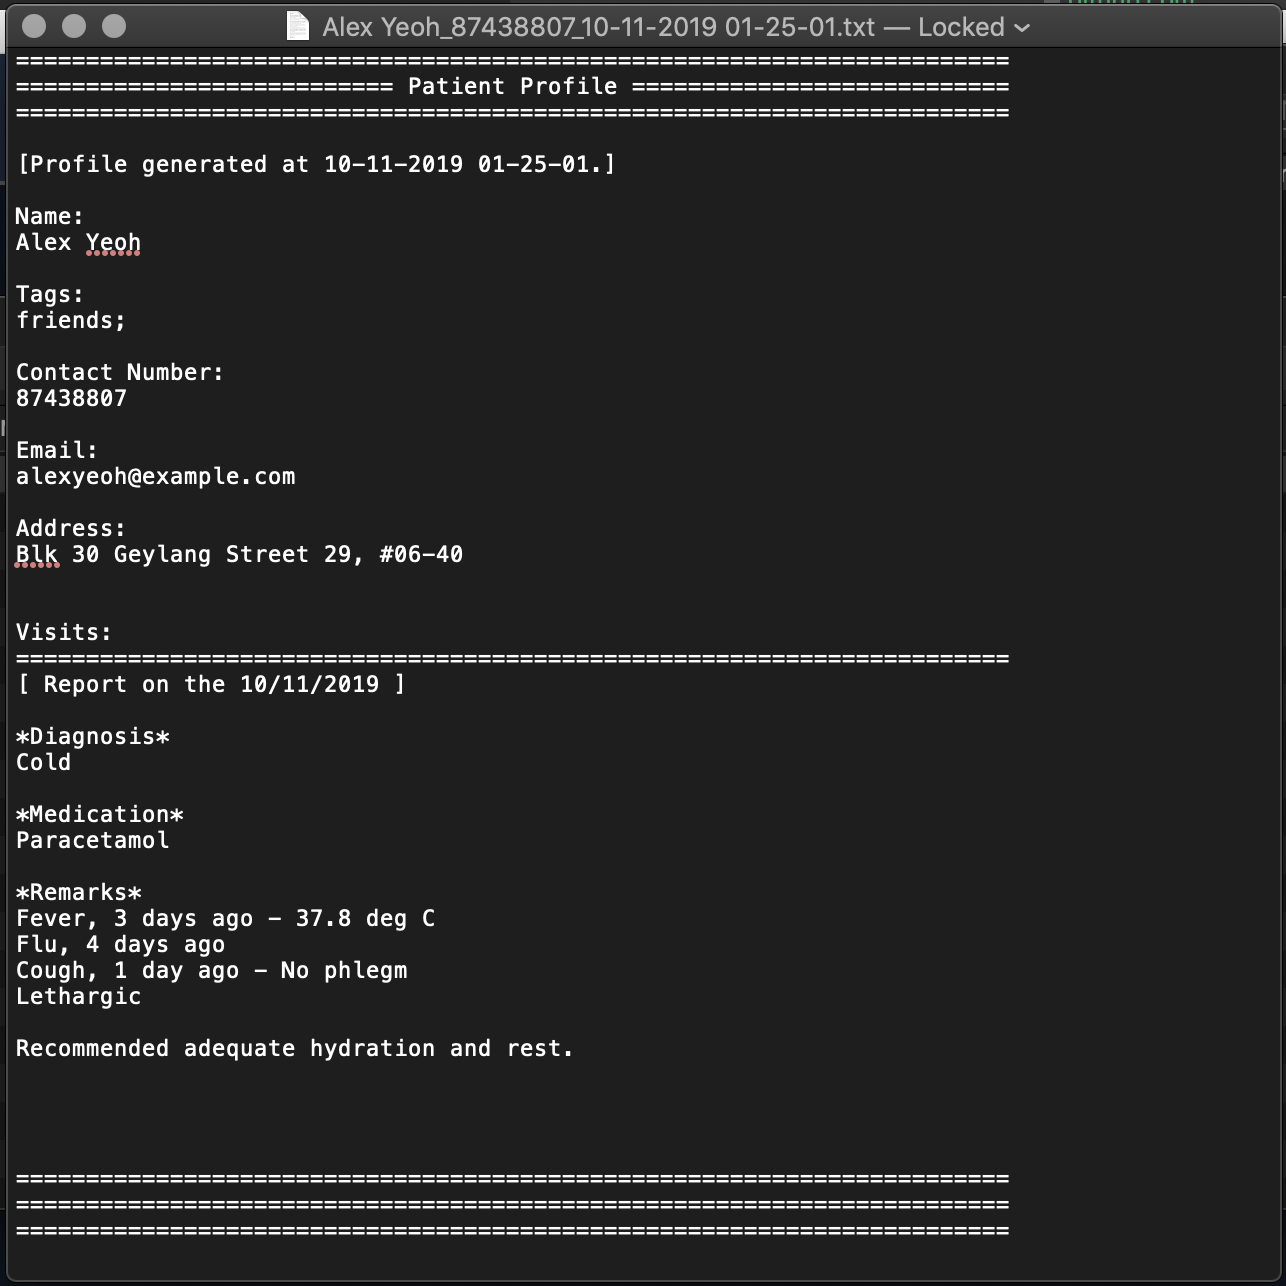
| While files are write-protected, you can still create duplicate copies for editing. Data encryption and safer data handling is planned for VISIT v2.0 (See Upcoming-Features). |
Contributions to the Developer Guide
The section below is an excerpt from VISIT’s Developer Guide, describing the implementation of the Profile enhancement in VISIT. This demonstrates my ability to write technical documentation and the technical depth of my contributions to the project. |
Profile feature
Implementation
The Profile feature allows the user to be able to see the full details of the patient as well as all relevant visit information (See Visit Report Feature) from a single panel. Attributes of the patient is extracted from the Person instance, including the Name, Address, Phone, Email, Tags and VisitList. The Profile feature also enables users to export the Profile as a read-only text file for archiving.
Profile Panel Implementation:
The displaying of the patient profile panel is mainly facilitated by the following components:
Given below is a simple example usage scenario demonstrate how Profile feature behaves and interacts with the other components:
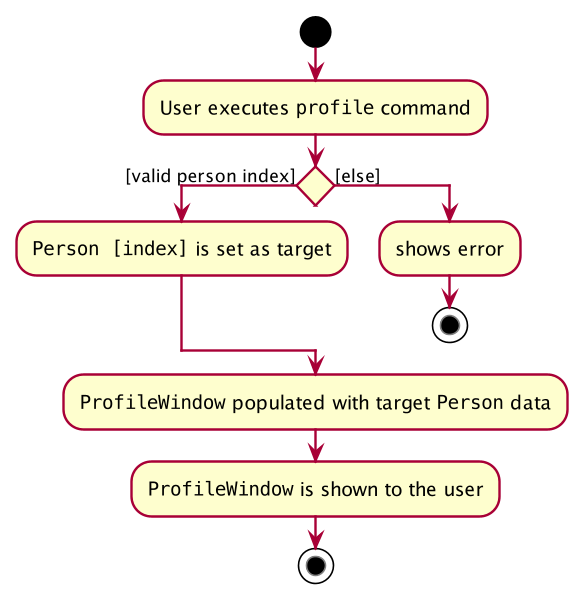
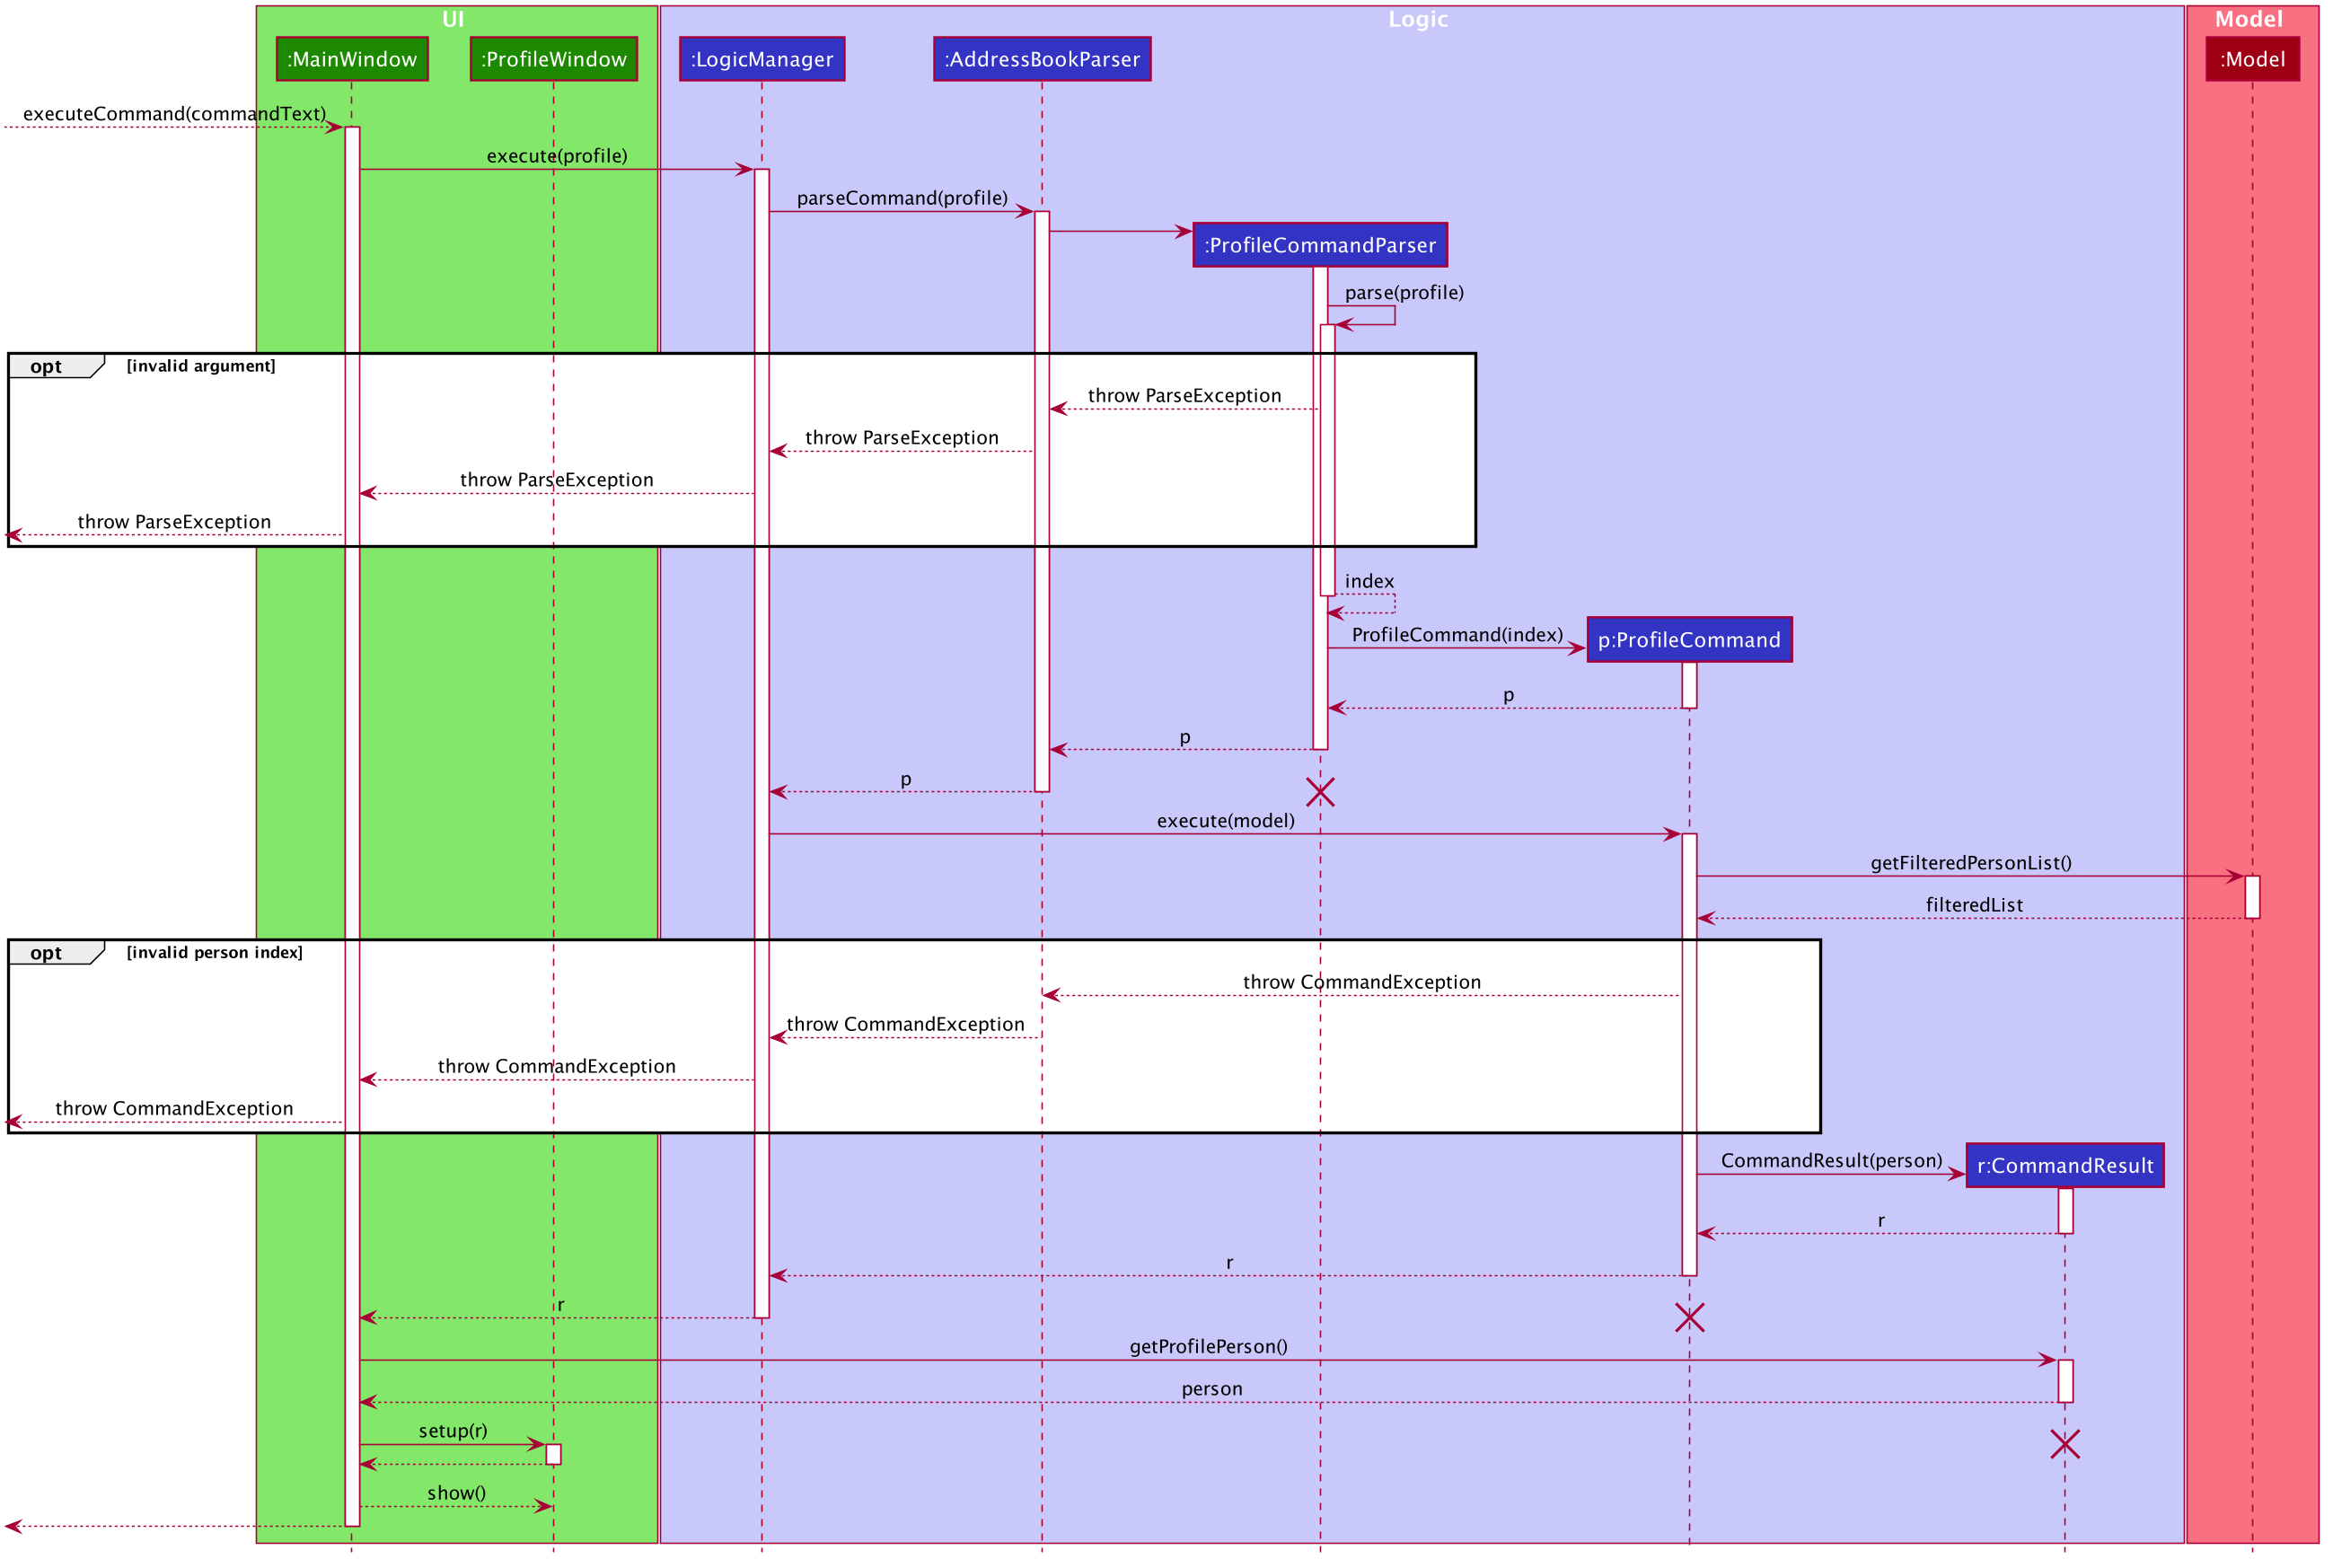
1. The user executes profile 3 command view the profile of the 3rd person shown in VISIT’s current list. This is parsed as a ProfileCommand, which is then executed.
2. The Person instance from the filtered Person list from the current model and returns a CommandResult with the Person instance as an attribute.
3. MainWindow#executeCommand() is then executed, calling ProfileWindow#setup() which populates the hidden Profile Window with the attributes of the Person instance before MainWindow#handleProfilePanel() is called to show the Profile Window to the user.
[4]. In this optional step, users can choose to export the Patient’s Profile as a .txt file by pressing the p key or clicking on the Generate Profile File button on the UI. The implementation of this is detailed in the next section.
5. After viewing the relevant information, the user presses the 'esc' key which closes the form. This causes an event handler in ProfileWindow which listens for a KeyEvent.KEY_RELEASED event where the event code equates to KeyCode.ESCAPE ('esc' key) to trigger, which hides the profile window.
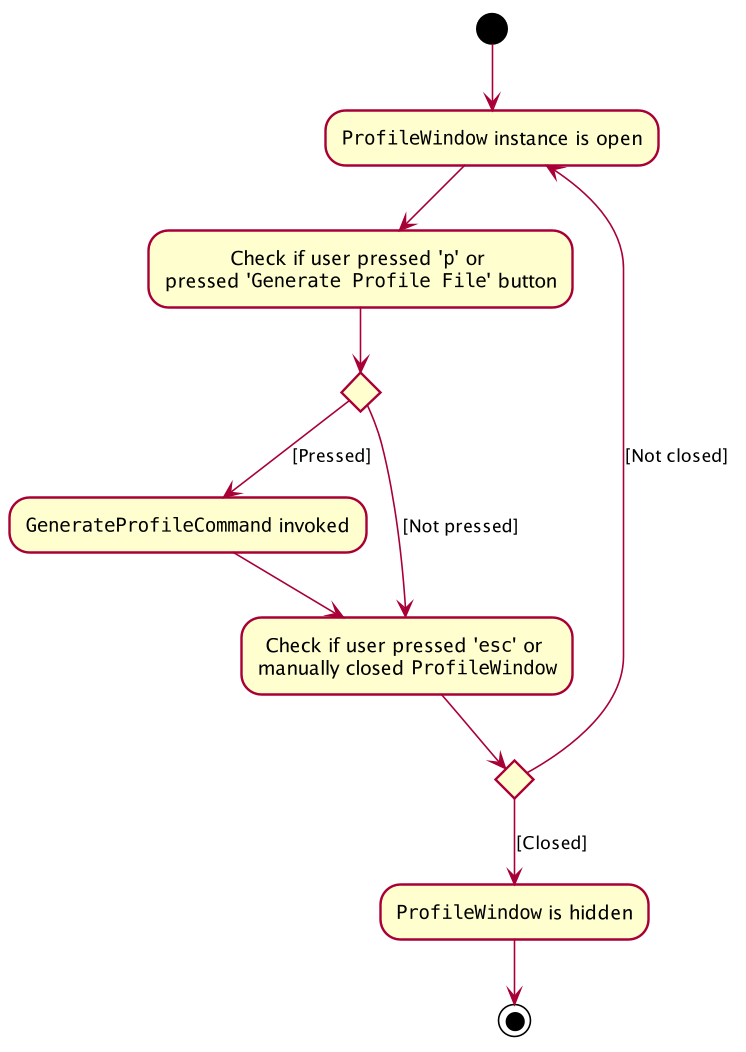
The user is able to close the ProfileWindow form by clicking the 'x' on the top right of the form as well.
|
This sequence diagram fully shows what happens when a user executes the Profile Command:
Profile Generation Implementation:
The patient profile generation functionality is mainly facilitated by the following components:
The following is a scenario to illustrate the behaviour of how this functionality works:
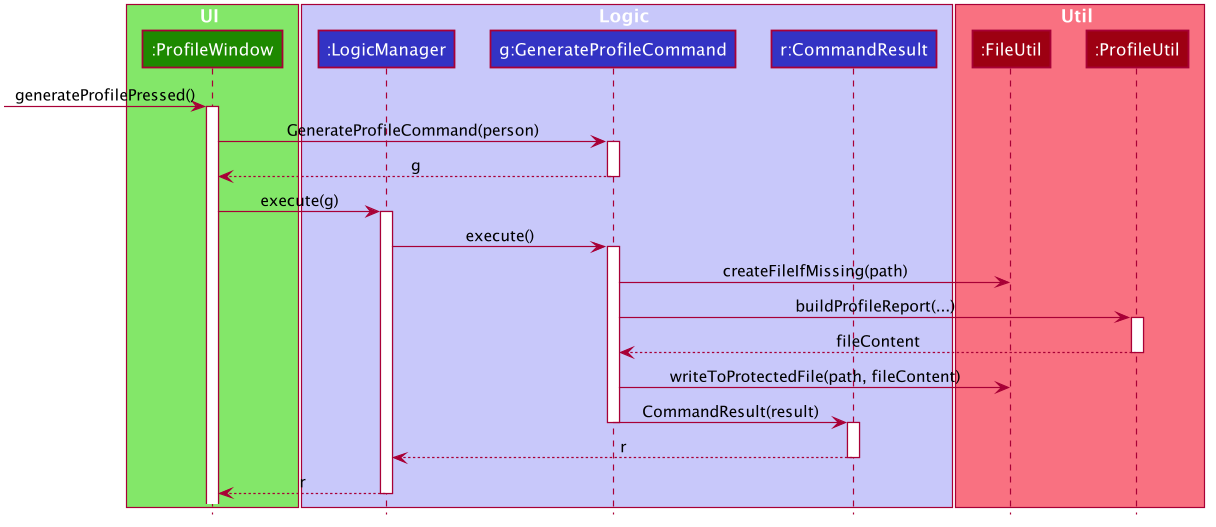
1. The user presses the p key or the Generate Profile File button on the Profile Panel. This invokes the generateProfilePressed() in ProfileWindow.
2. This generates a new GenerateProfileCommand instance relating to the Person that ProfileWindow is currently on. This command is then executed using the same LogicManager as ProfileWindow.
3. The executed command uses FileUtil to generate the parent file (generated_profiles) if it has not been created.
4. ProfileUtil is invoked to assemble a String containing the entire content of the ProfileWindow in a presentable manner.
5. FileUtil is then called again to generate a read-only .txt file containing the file content. A CommandResult indicating success is the propagated back to ProfileWindow.
6. Upon success, a small message is generated next to the Generate Profile File button on the Profile Panel.
This simplified sequence diagram summarizes the critical interactions between ProfileWindow, GenerateProfileCommand, FileUtil and ProfileUtil:
Design Considerations
Aspect: How Profile shows the information from the patient in ProfileWindow
ProfileWindow currently uses the Person class as its data structure to access all the relevant information on the Profile Panel. This presents some design considerations as listed here:
-
Alternative 1 (current choice): Does not create an explicit
Profileclass to store the Profile data.-
Pros: Easy to implement, more straight forward implementation. Defensive copies of Person can be used instead of a explicit
Profileclass which contains the exact same field variables as a Person. -
Cons: May cause dependency issues as this increases coupling, with relation to the Profile and Patient class.
-
-
Alternative 2: Create an explicit
Profileclass, which is instanced every command call.-
Pros: Decreases coupling by cutting down on the direct calls to the
Personinstance. -
Cons: Adds to bloat in code structure, as it is very similar to
Personclass. We must ensure that theProfileinstance generated is correct every time.
-