By: Team UnrealUnity Since: Sep 2019 Licence: MIT
1. Setting up
Refer to the guide here.
2. Design
2.1. Architecture
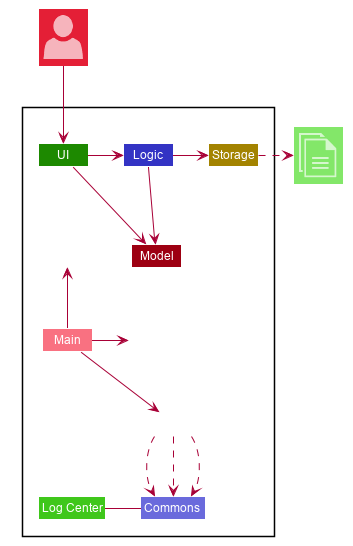
The Architecture Diagram given above explains the high-level design of the App. Given below is a quick overview of each component.
The .puml files used to create diagrams in this document can be found in the diagrams folder.
Refer to the Using PlantUML guide to learn how to create and edit diagrams.
|
-
At app launch: Initializes the components in the correct sequence, and connects them up with each other.
-
At shut down: Shuts down the components and invokes cleanup method where necessary.
Commons represents a collection of classes used by multiple other components.
The following class plays an important role at the architecture level:
-
LogsCenter: Used by many classes to write log messages to the App’s log file.
The rest of the App consists of four components.
Each of the four components
-
Defines its API in an
interfacewith the same name as the Component. -
Exposes its functionality using a
{Component Name}Managerclass.
For example, the Logic component (see the class diagram given below) defines it’s API in the Logic.java interface and exposes its functionality using the LogicManager.java class.

How the architecture components interact with each other
The Sequence Diagram below shows how the components interact with each other for the scenario where the user issues the command delete 1.
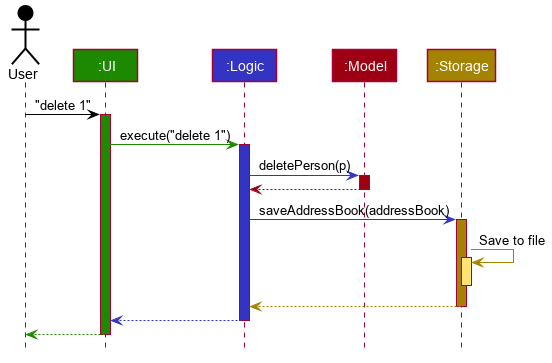
delete 1 commandThe sections below give more details of each component.
2.2. UI component
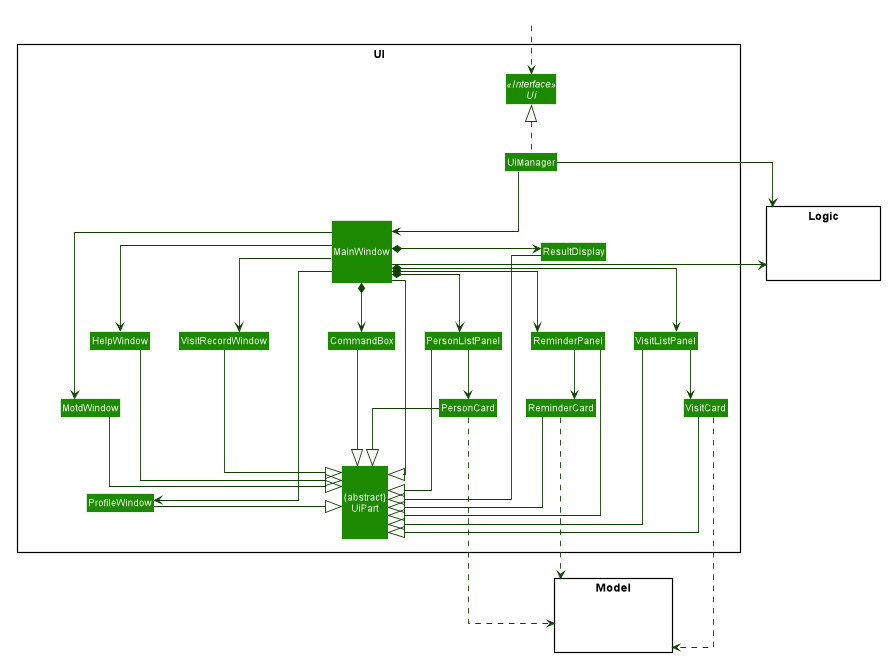
API : Ui.java
The UI consists of a MainWindow that is made up of parts e.g.CommandBox, ResultDisplay, PersonListPanel, ReminderPanel, etc.
All these, including the MainWindow, inherit from the abstract UiPart class.
Other UI parts such as HelpWindow, VisitRecordWindow, are not displayed as UI elements in the MainWindow but opens up through a command entered.
The UI component uses JavaFx UI framework. The layout of these UI parts are defined in matching .fxml files that are in the src/main/resources/view folder. For example, the layout of the MainWindow is specified in MainWindow.fxml
The UI component,
-
Executes user commands using the
Logiccomponent. -
Listens for changes to
Modeldata so that the UI can be updated with the modified data.
2.3. Logic component
API :
Logic.java
-
Logicuses theAddressBookParserclass to parse the user command. -
This results in a
Commandobject which is executed by theLogicManager. -
The command execution can affect the
Model(e.g. adding a person). -
The result of the command execution is encapsulated as a
CommandResultobject which is passed back to theUi. -
In addition, the
CommandResultobject can also instruct theUito perform certain actions, such as displaying help to the user.
Given below is the Sequence Diagram for interactions within the Logic component for the execute("delete 1") API call.
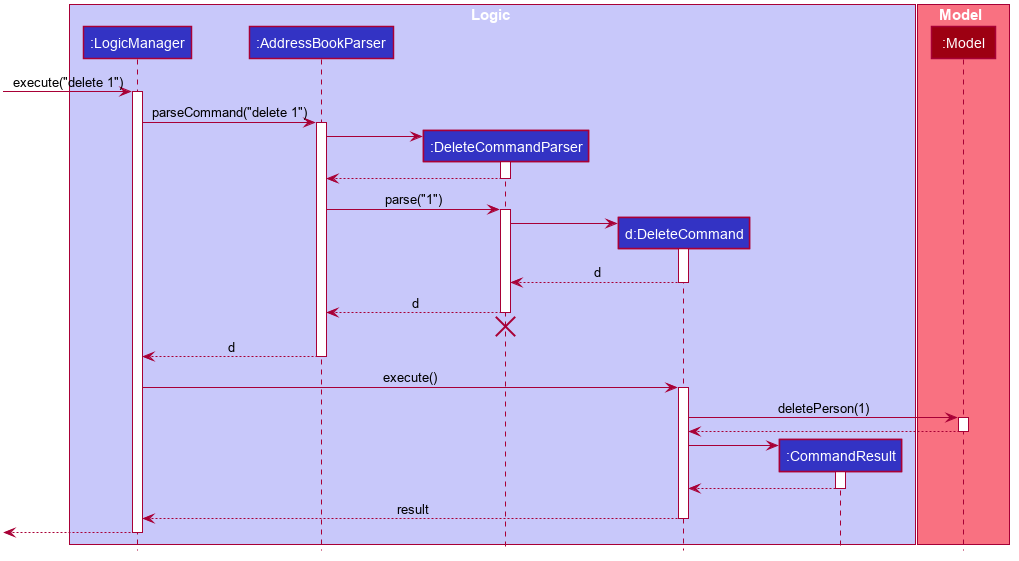
delete 1 Command
The lifeline for DeleteCommandParser should end at the destroy marker (X) but due to a limitation of PlantUML, the lifeline reaches the end of diagram.
|
2.4. Model component
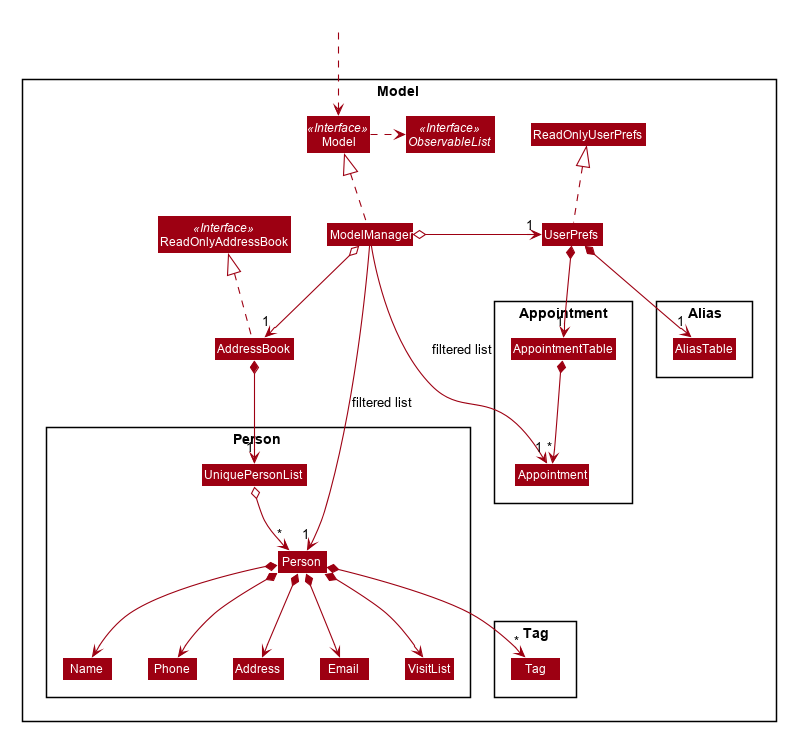
API : Model.java
The Model,
-
stores a
UserPrefobject that represents the user’s preferences, alias and appointments. -
stores the Address Book data.
-
exposes an unmodifiable
ObservableList<Person>andObservableList<Appointment>that can be 'observed' e.g. the UI can be bound to this list so that the UI automatically updates when the data in the list changes. -
does not depend on any of the other three components.
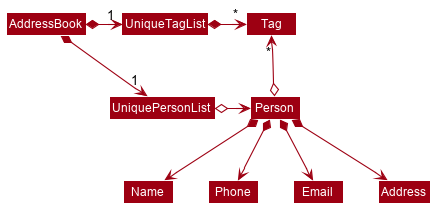
As a more OOP model, we can store a Tag list in Address Book, which Person can reference. This would allow Address Book to only require one Tag object per unique Tag, instead of each Person needing their own Tag object. An example of how such a model may look like is given below. |
2.5. Storage component
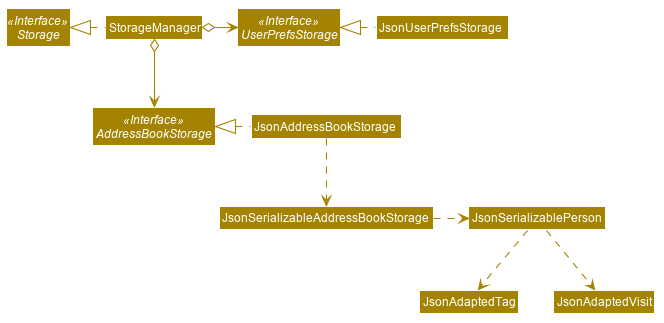
API : Storage.java
The Storage component,
-
can save
UserPrefobjects in json format and read it back. -
can save the Address Book data in json format and read it back.
2.6. Common classes
Classes used by multiple components are in the unrealunity.visit.commons package.
3. Implementation
This section describes some noteworthy details on how certain features are implemented.
3.1. Alias feature
3.1.1. Implementation
The alias mechanism is facilitated by AliasTable. At a lower level, saving of aliases is facilitated by use of a HashMap.
It is contained within UserPrefs and can be serialized together with the rest of the members in UserPrefs.
Additionally, it implements the following operations:
-
AliasTable#applyAlias(commandText)— Applies the longest stored aliases to the supplied command. -
AliasTable#addAlias(alias, aliasTo)— Adds a new alias to the alias table. -
AliasTable#removeAlias(alias)— Removes a existing alias from the alias table.
These operations are exposed in the Model interface as Model#applyAlias(commandText), Model#addAlias(alias, aliasTo) and Model#removeAlias(alias) respectively.
The following sequence diagram shows how adding an alias works:
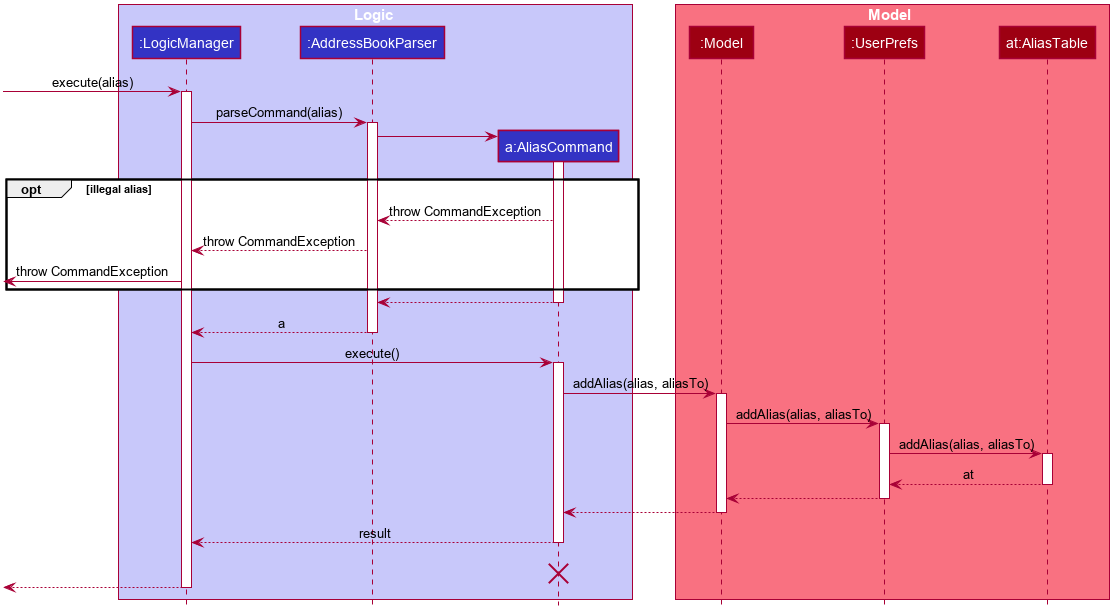
The check for and illegal alias consists of creating a new AddressBookParser and parsing the given alias into it, which is not shown in this diagram.
|
The unalias command does the opposite — it calls Model#removeAlias(alias) instead which calls Model#UserPref(alias) and AliasTable#removeAlias(alias)
The following sequence diagram shows how applying alias works:
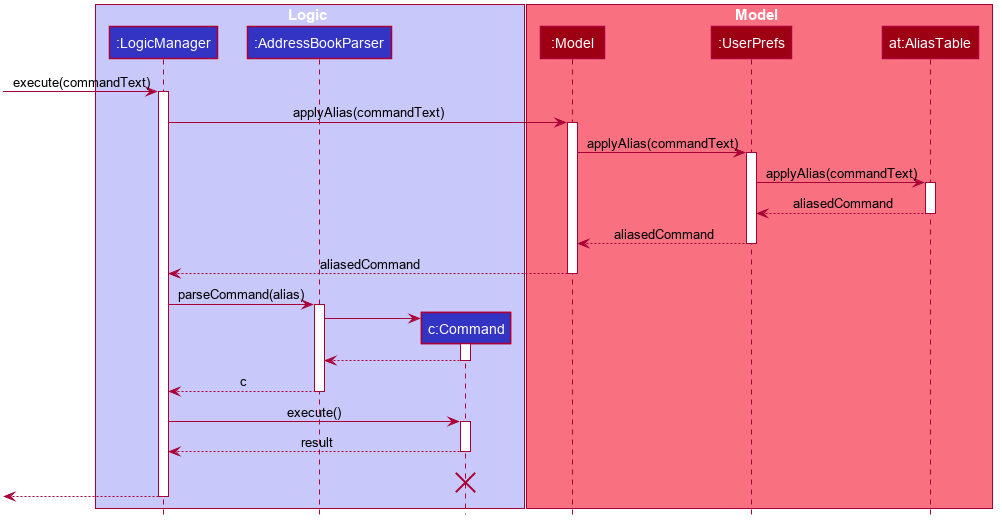
This is a generalized diagram which depicts what happens between execute(commandText) and LogicManager#parseCommand(alias). This process is not shown in other sequence diagrams.
|
A user-defined alias is considered a match with the user input if the alias is a substring, that starts from the beginning, of the user input. Specifically, AliasTable uses the regex (ALIAS)($| ).* to check if it is a match. Following that, it picks the longest matching alias to apply to the user input.
The following activity diagram shows how applying alias picks which alias to apply:

| An unfortunate side effect to matching the longest matching macro increases the time complexity of this operation to O(n) from O(1) if we used wholesale matching instead. |
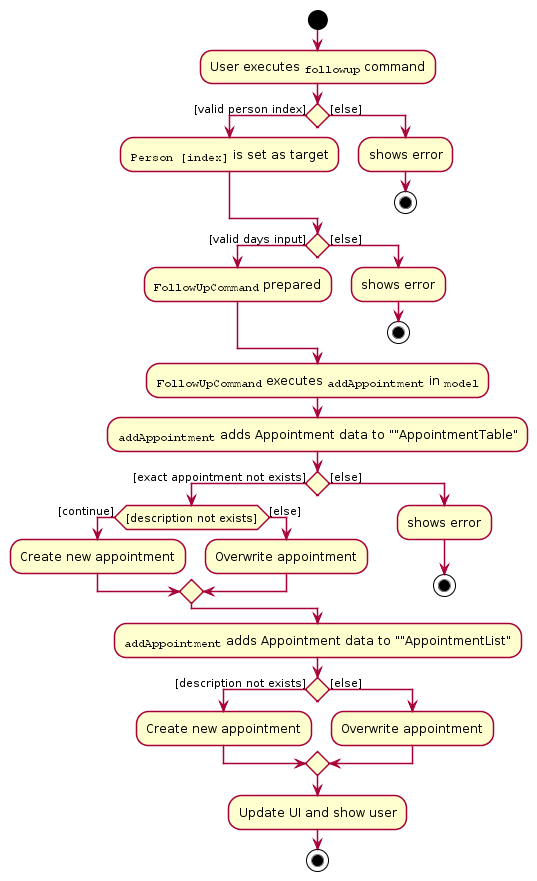
3.2. Appointments feature
3.2.1. Implementation
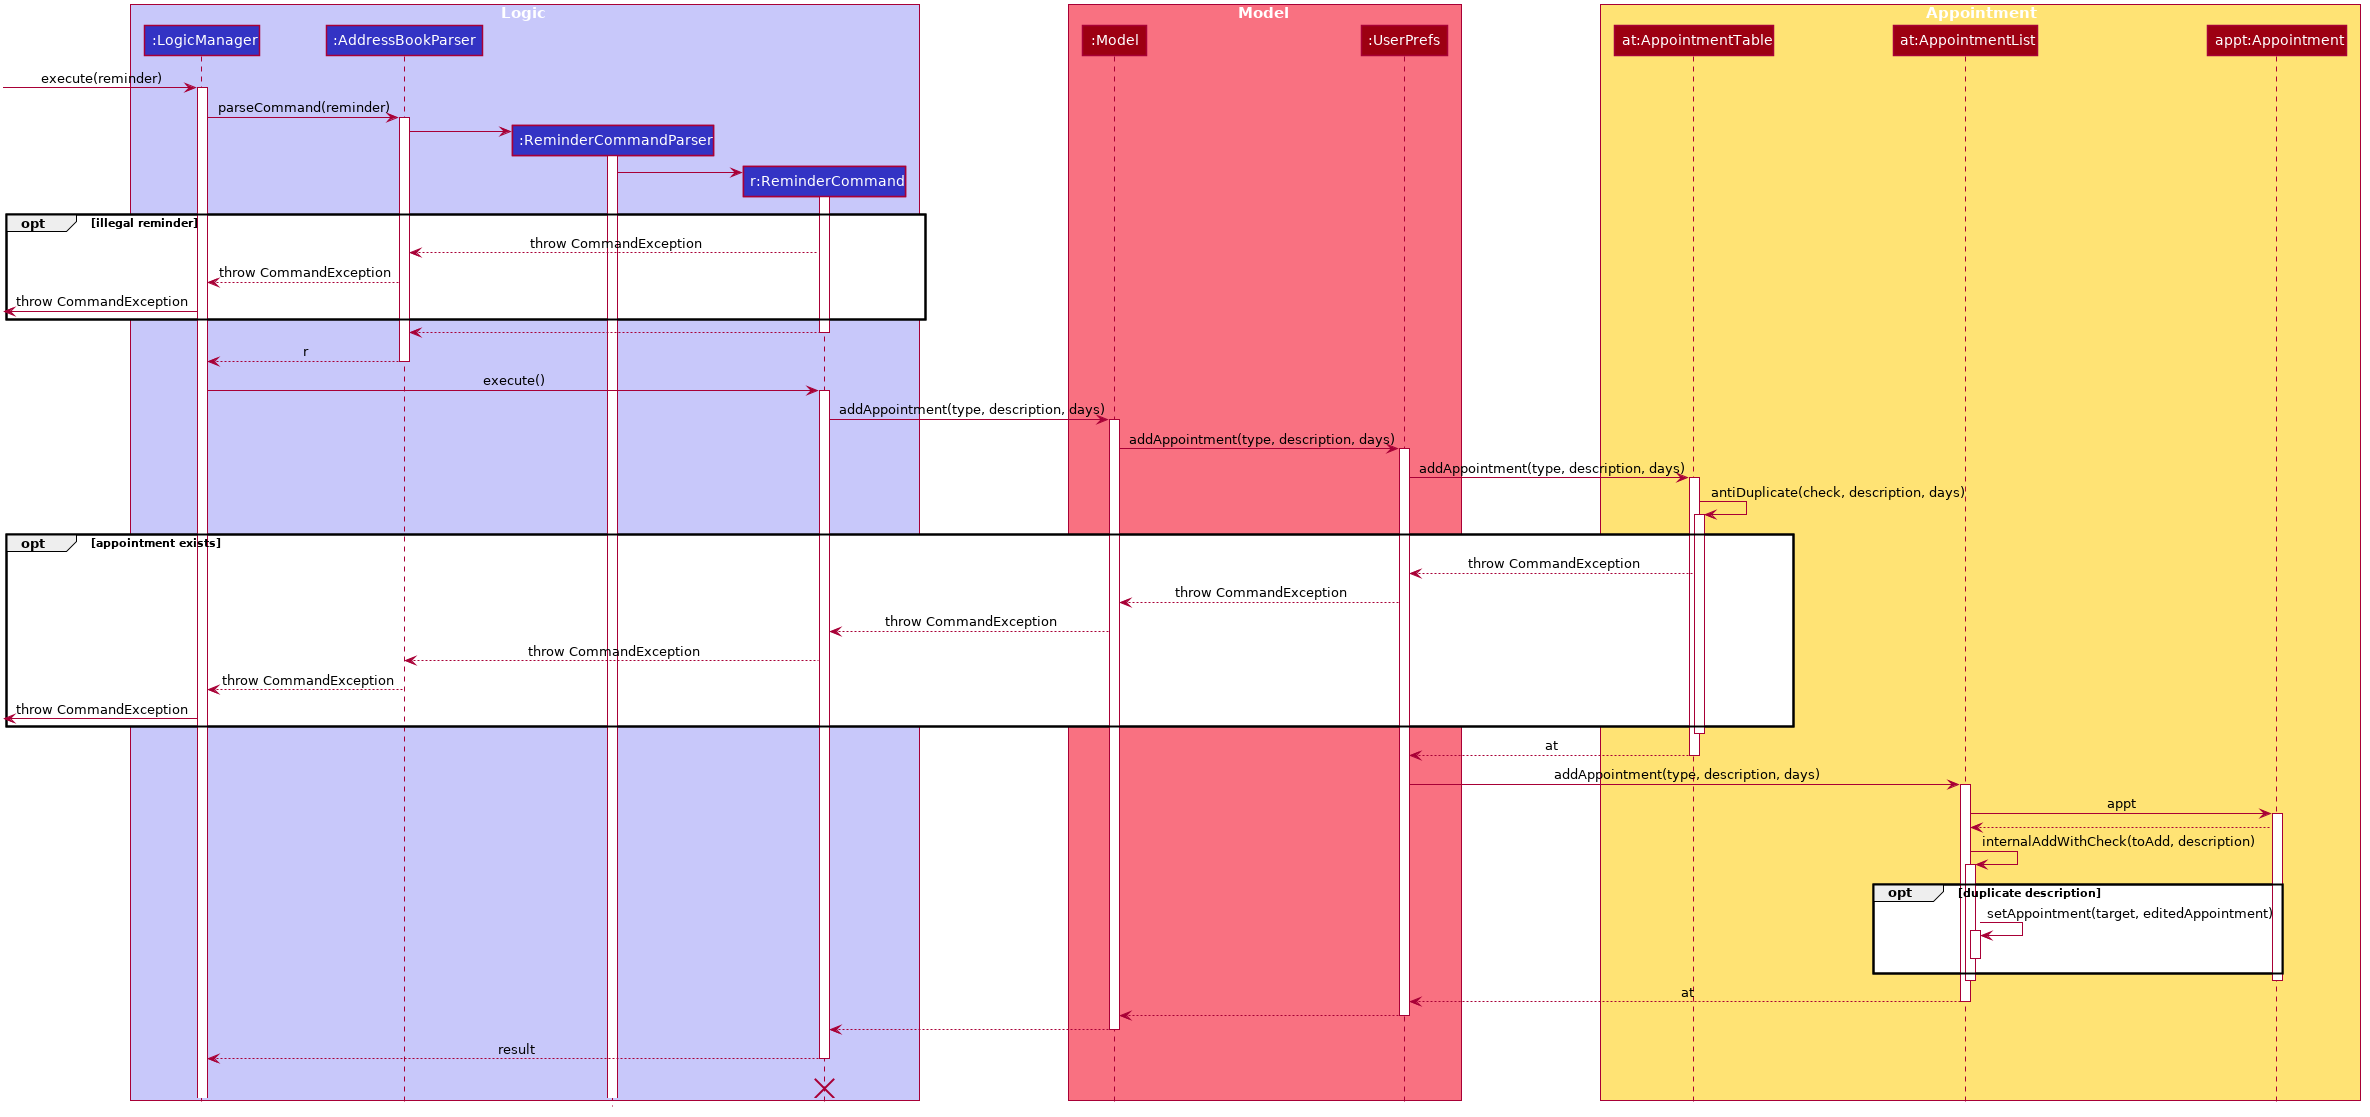
The Appointments feature comprises of Reminders and Follow-Ups. Users can create a generic Reminder to be notified of an ongoing "something to take note of", such as a hospital being closed. Follow-ups are used to plan future visits to patients. Both Reminders and Follow-ups are represented by the Appointment class, but are facilitated by the AppointmentList class for UI updates and AppointmentTable class for JSON updating.
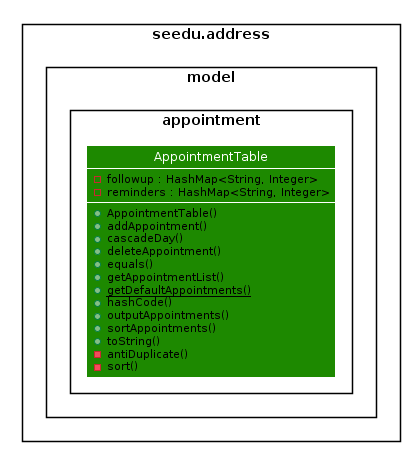
The AppointmentList and AppointmentTable are similar and run the same operations in parallel. This is a constraint due to how data is stored into JSON by the underlying program, and is on the timeline to be converged in v2.0. Due to their similarities, we will only look at AppointmentTable for the sake of this documentation.
It implements the following operations:
-
AppointmentTable#getDefaultAppointments()— Returns a default, emptyAppointmentTable. -
AppointmentTable#getAppointmentList()— Returns anObservableListversion of the Appointments for UI usage. This is necessary asAppointmentTableis loaded on launch andAppointmentListuses this data to propagate the UI. -
AppointmentTable#addAppointment(type, description, days)— Adds a new Appointment. -
AppointmentTable#deleteAppointment(description, days)— Deletes an appointment from VISIT. -
AppointmentTable#antiDuplicate(check, description, days)— Checks if the Appointment already exists. Returns true if there is no duplicate, false if there is a duplicate. -
AppointmentTable#sortAppointments()— Sorts the list of appointments by days remaining, then name. -
AppointmentTable#cascadeDay(days)— Decrements the days an Appointment has left. Run on application launch byUserPrefsafter calculating days elapsed. -
AppointmentTable#outputAppointments()— Outputs the Appointments to readable String.
These operations are exposed in the Model interface.
The following sequence diagram shows how adding an appointment works, using reminders as an example:
The following activity diagram shows how adding an appointment works, using follow-ups as an example:
3.3. Profile feature
3.3.1. Implementation
The Profile feature allows the user to be able to see the full details of the patient as well as all relevant visit information (See Visit Implementation) from a single panel. Attributes of the patient is extracted from the Person instance, including the Name, Address, Phone, Email, Tags and VisitList. The Profile feature also enables users to export the Profile as a read-only text file for archiving.
Profile Panel Implementation:
The displaying of the patient profile panel is mainly facilitated by the following components:
Given below is a simple example usage scenario demonstrate how Profile feature behaves and interacts with the other components:
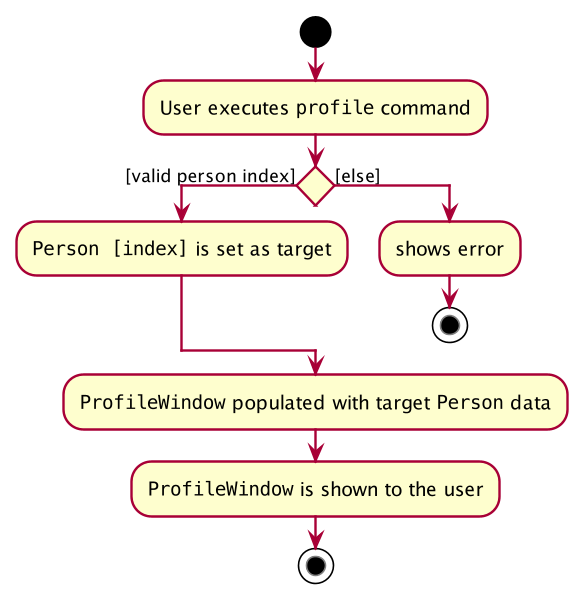
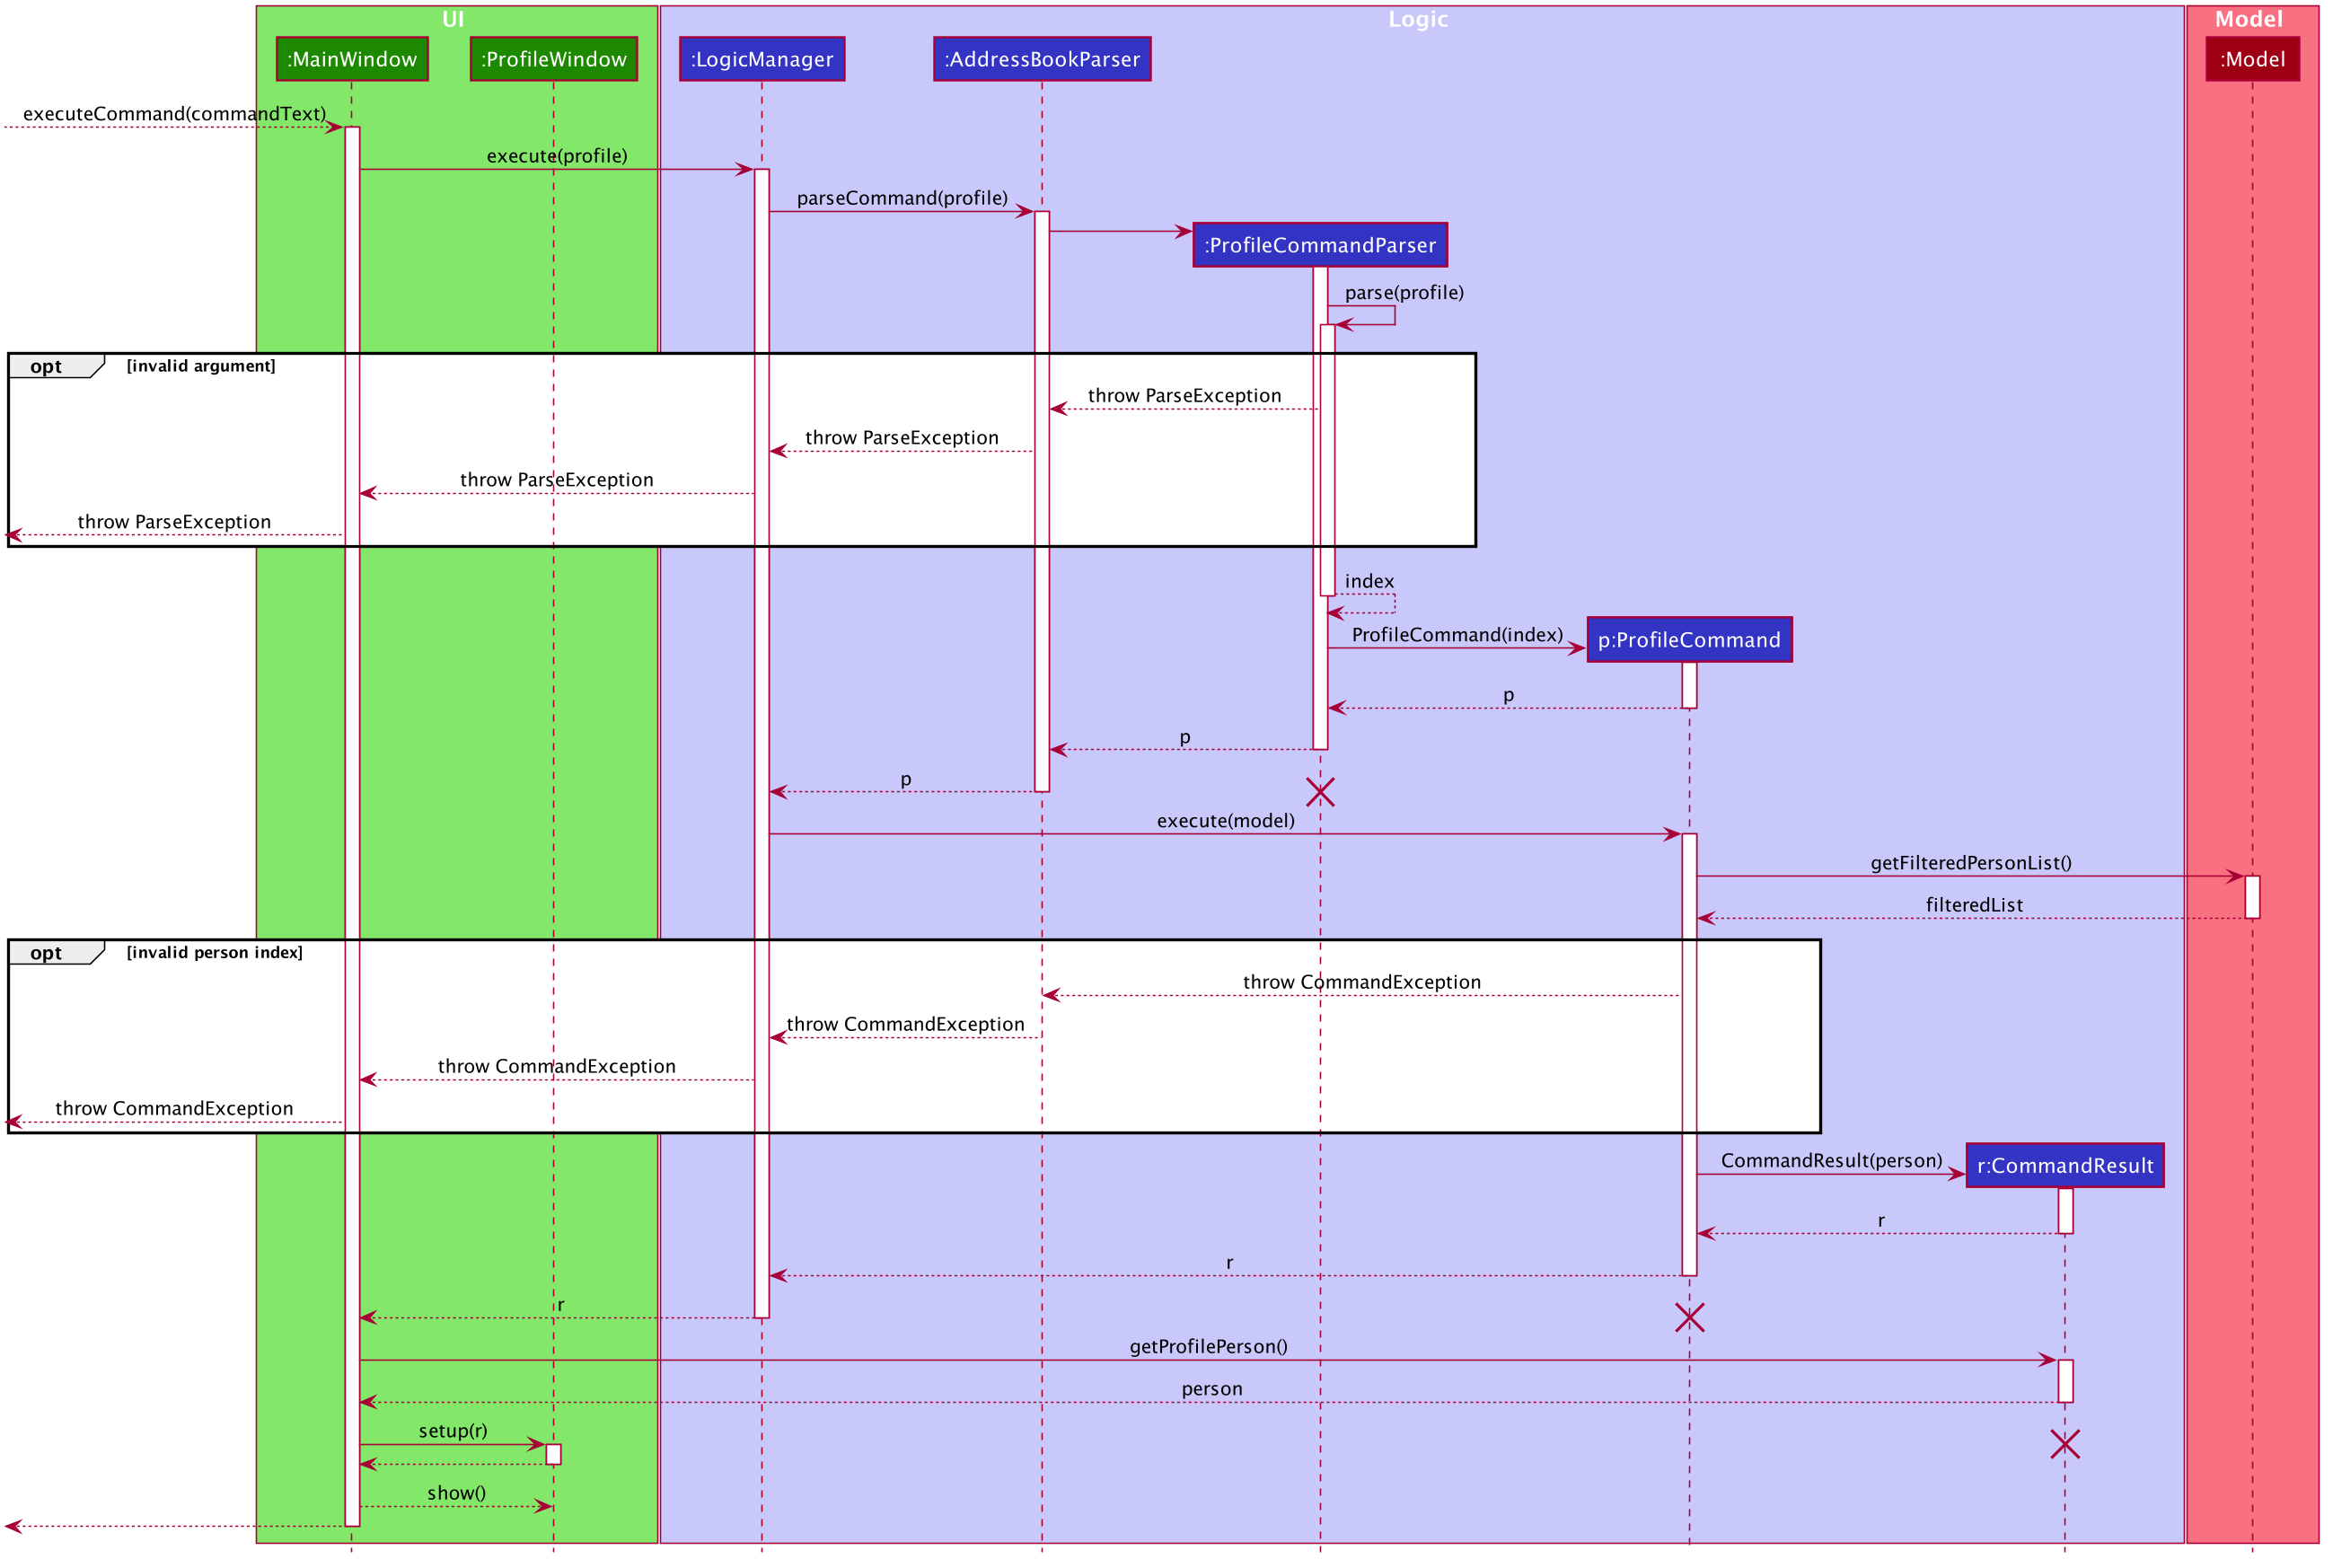
1. The user executes profile 3 command view the profile of the 3rd person shown in VISIT’s current list. This is parsed as a ProfileCommand, which is then executed.
2. The Person instance from the filtered Person list from the current model and returns a CommandResult with the Person instance as an attribute.
3. MainWindow#executeCommand() is then executed, calling ProfileWindow#setup() which populates the hidden Profile Window with the attributes of the Person instance before MainWindow#handleProfilePanel() is called to show the Profile Window to the user.
[4]. In this optional step, users can choose to export the Patient’s Profile as a .txt file by pressing the p key or clicking on the Generate Profile File button on the UI. The implementation of this is detailed in the next section.
5. After viewing the relevant information, the user presses the 'esc' key which closes the form. This causes an event handler in ProfileWindow which listens for a KeyEvent.KEY_RELEASED event where the event code equates to KeyCode.ESCAPE ('esc' key) to trigger, which hides the profile window.
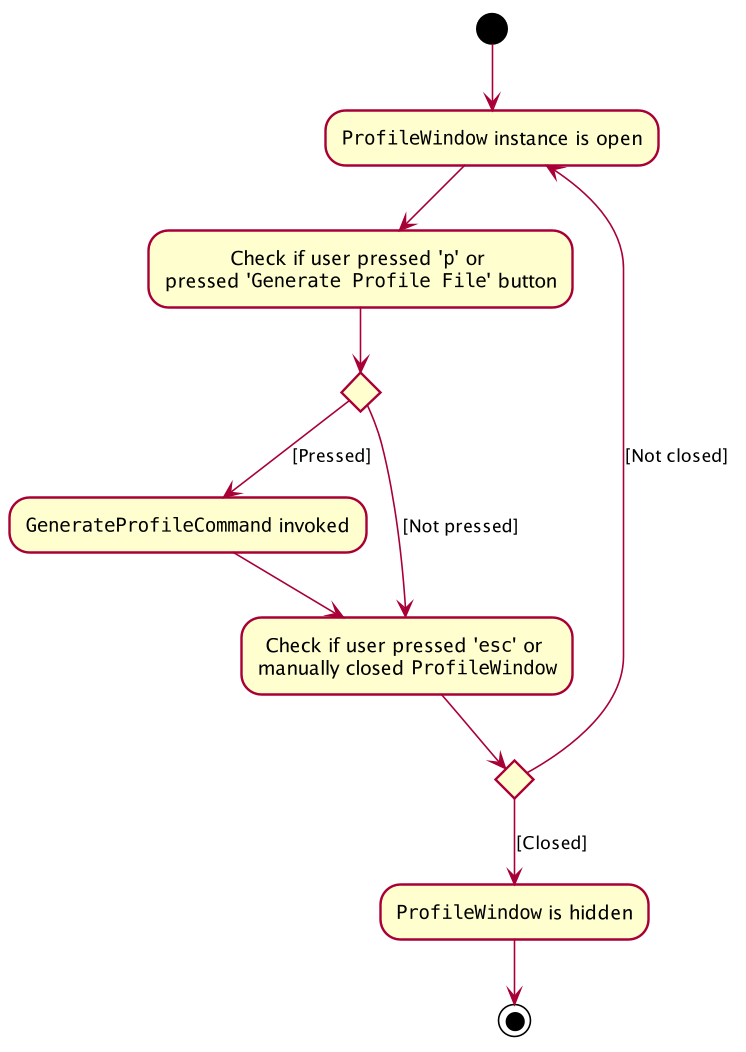
The user is able to close the ProfileWindow form by clicking the 'x' on the top right of the form as well.
|
This sequence diagram fully shows what happens when a user executes the Profile Command:
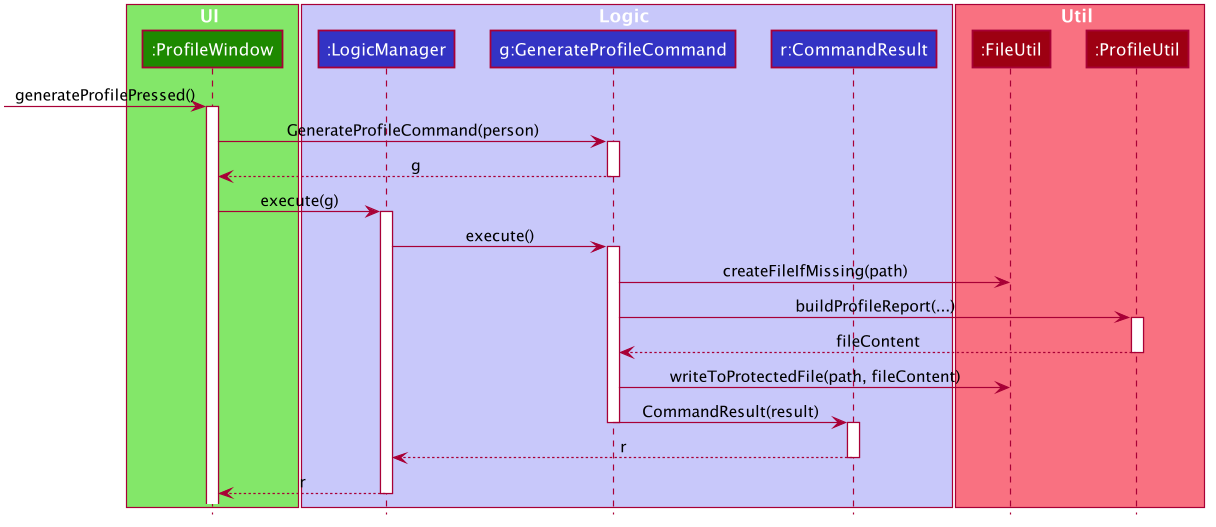
Profile Generation Implementation:
The patient profile generation functionality is mainly facilitated by the following components:
The following is a scenario to illustrate the behaviour of how this functionality works:
1. The user presses the p key or the Generate Profile File button on the Profile Panel. This invokes the generateProfilePressed() in ProfileWindow.
2. This generates a new GenerateProfileCommand instance relating to the Person that ProfileWindow is currently on. This command is then executed using the same LogicManager as ProfileWindow.
3. The executed command uses FileUtil to generate the parent file (generated_profiles) if it has not been created.
4. ProfileUtil is invoked to assemble a String containing the entire content of the ProfileWindow in a presentable manner.
5. FileUtil is then called again to generate a read-only .txt file containing the file content. A CommandResult indicating success is the propagated back to ProfileWindow.
6. Upon success, a small message is generated next to the Generate Profile File button on the Profile Panel.
This simplified sequence diagram summarizes the critical interactions between ProfileWindow, GenerateProfileCommand, FileUtil and ProfileUtil:
3.3.2. Design Considerations
Aspect: How Profile shows the information from the patient in ProfileWindow
ProfileWindow currently uses the Person class as its data structure to access all the relevant information on the Profile Panel. This presents some design considerations as listed here:
-
Alternative 1 (current choice): Does not create an explicit
Profileclass to store the Profile data.-
Pros: Easy to implement, more straight forward implementation. Defensive copies of Person can be used instead of a explicit
Profileclass which contains the exact same field variables as a Person. -
Cons: May cause dependency issues as this increases coupling, with relation to the Profile and Patient class.
-
-
Alternative 2: Create an explicit
Profileclass, which is instanced every command call.-
Pros: Decreases coupling by cutting down on the direct calls to the
Personinstance. -
Cons: Adds to bloat in code structure, as it is very similar to
Personclass. We must ensure that theProfileinstance generated is correct every time.
-
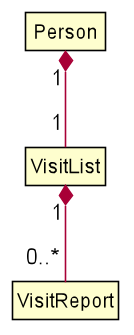
3.4. Visitation Report feature
3.4.1. Implementation
The Visitation Report feature allows the user to add, delete and edit a VisitReport such that for every housecall, information like the prescription and diagnosis can be stored. Every Person has a VisitList attribute and each VisitList object contains an arraylist of VisitReport objects. The feature is facillitated by VisitRecordWindow which creates a form for the user to key in the details of the report, VisitListPanel which creates an indexed pop up list of visit reports for the user to check the index of the report they want to edit/delete and SaveVisitCommand which saves the users input from the form. The following operations are also implemented:
-
VisitList#addRecord()— Adds newVisitReportobject to stored arraylist -
VisitList#editRecord()— ReplacesVisitReportobject at given index in arraylist with givenVisitReport -
VisitList#deleteRecord()— DeletesVisitReportby index from stored arraylist
The class diagram below shows the new additions to the Person class.
Given below is an example usage scenario and how every component of the Visitation Report feature behaves at each step.
Step 1. The user executes addvisit 5 v/12/12/2019 command to add a visit report to the visitlist of the 5th person in the address book. This returns a CommandResult which has the attribute date set as String 12/12/2019. MainWindow#executeCommand() is called and the check for CommandResult#isAddVisit() passes, calling VisitRecordWindow#setReportInfo() to pass the index of the person, the date, and a Logic object to initialize the respective attributes in the VisitRecordWindow class. MainWindow#handleShowVisitForm() is then called to display a pop up form for the user to fill in.
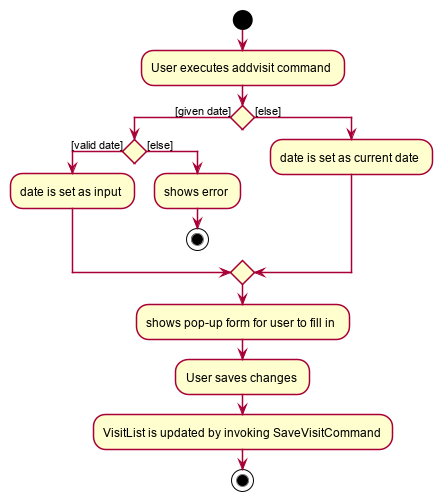
If the user executes addvisit 5 instead, the date attribute of the CommandResult will be set as the current date and the rest of the flow remains the same.
|
Step 2. The user fills in the form and presses f2 on the keyboard or clicks the submit button to save the report. This calls VisitRecordWindow#saveReport() which will create a new SaveVisitCommand and executes it, updating the VisitList of the person via Model#setPerson().
Step 3. The user decides to edit the report and executes the editvisit 1 i/1 command.MainWindow#executeCommand() is called and the check for CommandResult#isEditVisit() passes, calling VisitRecordWindow#setOldReportInfo() which initializes the respective attributes of VisitRecordWindow and populate the form with the content of the VisitReport from CommandResult#getOldReport() .MainWindow#handleShowVisitForm() is then called to display a pop up form for the user to fill in.
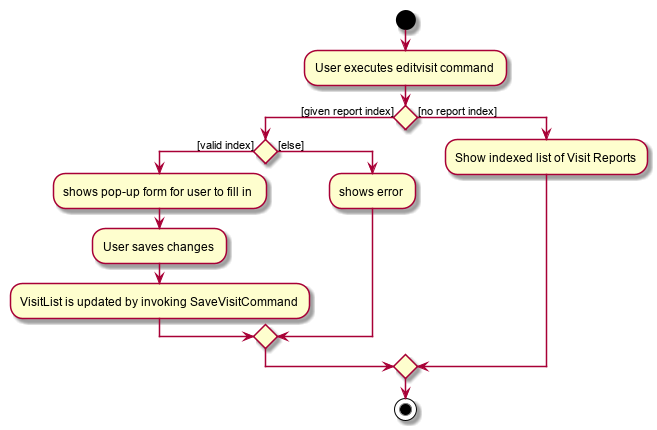
As shown in the figure above, if the user executes editvisit 1 instead, a CommandResult with a ObservableList<VisitReport> object will be returned. MainWindow#executeCommand() 's check for CommandResult#isShowVisitList() passes, calling VisitListPanel#setup() which populates the VisitListPanel with the contents of the ObservableList<VisitReport> object from CommandResult#getObservableVisitList(). Instead of displaying the pop-up form, MainWindow#handleShowVisitList() is called to display a pop up list showing an indexed list of all visitation records of the person.
Step 4. The user edits the form and presses F3 on the keyboard or clicks the submit button to save the changes. The same mechanism mentioned in Step 2 is used to update the contents of the edited visit report.
The sequence diagram below shows how Step 3 and Step 4 works.
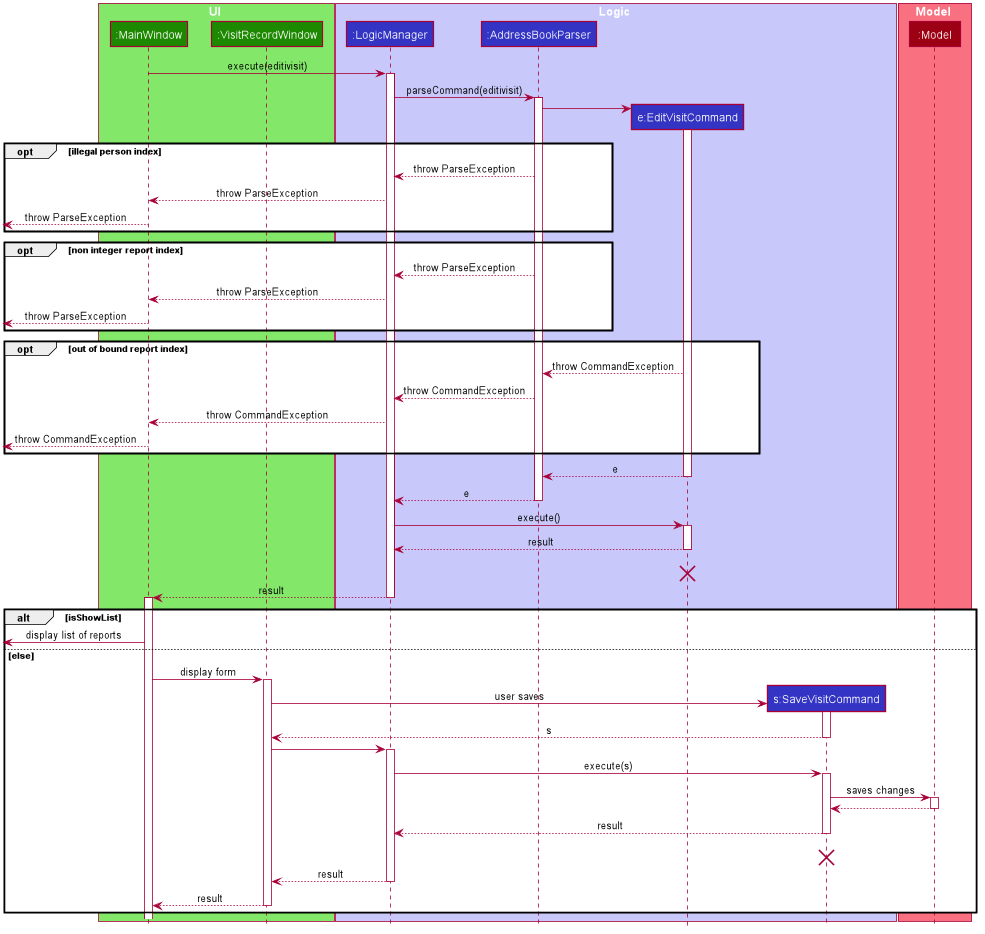
EditVisitCommand and SaveVisitCommand sequence diagramStep 5. The user then decides that the report was beyond salvaging and decides to delete it. Executing the command deletevisit 1 d/1, VisitList#deleteRecord() deletes the entry from the arraylist and Model#setPerson() updates the person with the new VisitList. The CommandResult#isShowVisitList() check in MainWindow#executeCommand() passes and a pop up list showing an indexed list of all visitation records of the person is displayed.
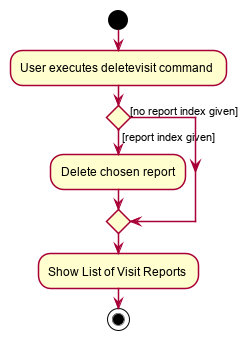
If the user executes deletevisit 1 instead, the index value will be set to -1 and the VisitList#deleteRecord() block would be skipped, but the rest of the flow remains the same.
|
3.4.2. Design Considerations
Aspect: Range of acceptable dates for addvisit
-
Alternative 1 (current choice): Only allow dates with years 19xx or 2xxx
-
Pros: Prevents user from keying in rubbish dates like year 9999 or 0000
-
Cons: Must conduct 2 checks for date in parser, one for the format dd/MM/19yy and one for the format dd/MM/2yyy.
-
-
Alternative 2: Place no restriction on valid years
-
Pros: Only one check for dd/MM/yyyy format is required.
-
Cons: User can key in rubbish values like dd/MM/9102 or dd/MM/0192
-
Aspect: Keyboard binding to save report
-
Alternative 1 (current choice):
F2key-
Pros: No conflict with any other functions.
-
Cons: Not the most intuitive choice for users.
-
-
Alternative 2:
Enterkey-
Pros: Very intuitive choice for saving.
-
Cons: It’s also used to get to the next line, thus using it as the save button means users can no longer press
Enterfor next line
-
3.5. GUI Redesign
The GUI Redesign is done to include the new features made for the VISIT application, as well as improve the overall user experience with a easily readable interface that displays every important information in a glance.
3.5.1. Current Implementation
The current redesign of the GUI includes the addition of:
-
the
ReminderPanelto display upcoming appointments -
the
VisitListPanelto display the visit reports stored in a patient’s profile. (as mentioned in Visitation Report feature) -
the
VisitRecordWindowform for the user to enter the required information. (as mentioned in Visitation Report feature) -
the
ProfileWindowto display the full profile information of a patient. -
the
MotdWindowto display the appointments in a new window. Motd stands for Message of the Day.
In addition to these, VISIT’s CSS theme is updated to fit current standards of GUI design, with a more pronounced color palette and a clearer font.
The following is the snippet of the class diagram of the Ui Component with the new Classes:
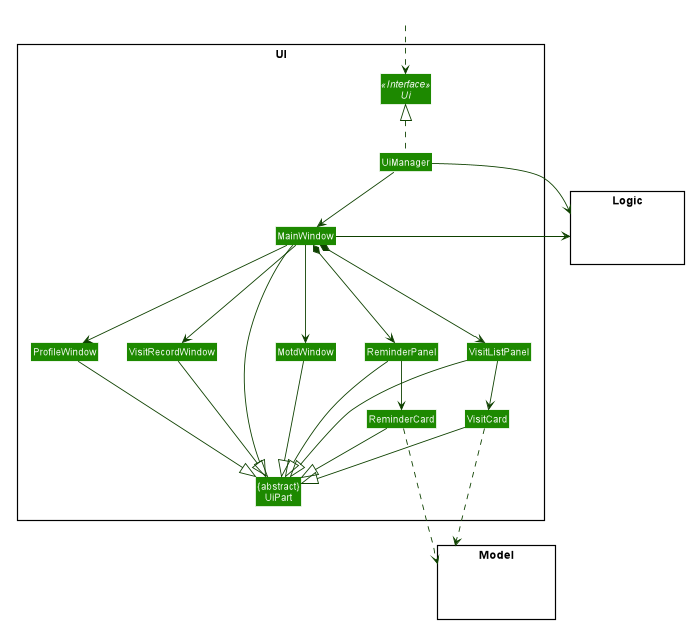
-
The
MainWindowhas been new panel which is the ReminderPanel. -
Three new Windows,
VisitRecordWindow,ProfileWindowandMotdWindow, are in use in addition to the MainWindow. These windows are opened through their respective commands. -
ReminderCardandVisitCardgets its data from Model, similar to PersonCard.
3.5.2. Future implementation [Coming in v2.0]
For future GUI design considerations in v2.0 and above, the panels of each feature such as PersonListPanel and ReminderPanel can be
separated by tabs, through a dashboard interface. This allows more information to be displayed within each tab, allowing
users to work with more data.
3.6. Logging
We are using java.util.logging package for logging. The LogsCenter class is used to manage the logging levels and logging destinations.
-
The logging level can be controlled using the
logLevelsetting in the configuration file (See Section 3.7, “Configuration”) -
The
Loggerfor a class can be obtained usingLogsCenter.getLogger(Class)which will log messages according to the specified logging level -
Currently log messages are output through:
Consoleand to a.logfile.
Logging Levels
-
SEVERE: Critical problem detected which may possibly cause the termination of the application -
WARNING: Can continue, but with caution -
INFO: Information showing the noteworthy actions by the App -
FINE: Details that is not usually noteworthy but may be useful in debugging e.g. print the actual list instead of just its size
3.7. Configuration
Certain properties of the application can be controlled (e.g user prefs file location, logging level) through the configuration file (default: config.json).
4. Documentation
Refer to the guide here.
5. Testing
Refer to the guide here.
6. Dev Ops
Refer to the guide here.
Appendix A: Product Scope
Target user profile:
-
has a need to manage a significant number of patients and their information
-
prefer desktop apps over other types
-
can type fast
-
prefers typing over mouse input
-
is reasonably comfortable using CLI apps
Value proposition: manage contacts faster than a typical mouse/GUI driven app
Appendix B: User Stories
Priorities: High (must have) - * * *, Medium (nice to have) - * *, Low (unlikely to have) - *
| Priority | As a … | I want to … | So that I can… |
|---|---|---|---|
|
new user |
see usage instructions |
refer to instructions when I forget how to use the App |
|
user |
add a new patient |
organize a patient’s relevant information |
|
user |
delete a patient |
remove patient entries that I no longer need |
|
user |
view the full profile of a patient by searching for his/her name |
see all details regarding a patient easily at a glance |
|
user |
record down details of each visitation |
keep track of the patients situation |
|
user |
set follow-up reminders |
check in on my patients after some time or when their medication runs out |
|
user |
have daily reminders of important deadlines |
keep track of appointments and visitations easily |
|
user |
see list of reminders |
keep track of what I need to keep track |
|
user |
have user-defined macros |
streamline my diagnosis documentation |
|
user |
sort my appointments |
see the more pressing deadlines first |
|
user |
remove a specific appointment |
get rid of an unnecessary reminder or visit |
|
user |
generate a text file detailing my patient’s profile and visits |
maintain a archive of patient profiles before deleting them |
|
user |
hide private contact details by default |
minimize chance of someone else seeing them by accident |
|
user with many persons in the address book |
sort persons by name |
locate a person easily |
Appendix C: Use Cases
(For all use cases below, the System is the VISIT and the Actor is the user, unless specified otherwise)
Use case: Delete patient
MSS
-
User requests to list patients
-
System shows a list of patients
-
User requests to delete a specific patient in the list
-
System deletes the patient
Use case ends.
Extensions
-
2a. The list is empty.
Use case ends.
-
3a. The given index is invalid.
-
3a1. System shows an error message.
Use case resumes at step 2.
-
Use case: View patient profile
MSS
-
User requests to list patients
-
System shows a list of patients
-
User requests to view patient profile by name/index
-
System shows patient profile
Use case ends.
Extensions
-
2a. The list is empty.
Use case ends.
-
3. The given name/index is invalid.
-
3a. System shows an error message.
Use case resumes at step 2.
-
-
4. The profile is empty.
Use case ends.
Use case: Record visitation details
MSS
-
Precondition: User can see list of patients
-
User requests to add new visitation record for a specific patient in the list
-
System adds new visitation record for chosen patient
Use case ends.
-
Extensions
-
1a. The given index is invalid.
-
1a1. VISIT shows an error message.
Use case resumes at step 1.
-
Use case: Edit visitation record
MSS
-
Precondition: User can see list of patients
-
User requests to edit visitation record for specific patient by patient index
-
VISIT shows pop-up form for user to edit visitation record
-
User saves edit
-
VISIT saves edit
Use case ends.
-
Extensions
-
1a. The user does not provide a record index
-
1a1. VISIT shows an indexed list of visitation records
Use case resumes at step 1.
-
Use case: Delete visitation record
MSS
-
Precondition: User can see list of persons
-
User requests to delete visitation record for specific patient by index
-
VISIT deletes visitation record
Use case ends.
-
Extensions
-
1a. The user does not provide a record index
-
1a1. VISIT shows an indexed list of visitation records Use case resumes at step 1.
-
Use case: Save user-defined macros
MSS
-
User requests to save user-defined macros
-
VISIT saves user-defined macros
Use case ends.
Extensions
-
1a. The content of the macro is empty.
-
1a1. VISIT shows an error message.
Use case resumes at step 1.
-
-
1b. The shortcut of the macro is illegal.
-
1b1. VISIT shows an error message.
Use case resumes at step 1.
-
Use case: Invoke user-defined macros
MSS
-
User requests to invoke user-defined macros
-
VISIT outputs user-defined data
Use case ends.
Use case: Delete user-defined macros
MSS
-
User requests to remove user-defined macros
-
VISIT removes user-defined macro
Use case ends.
Extensions
-
1a. The content of the macro name is empty.
-
1a1. VISIT shows an error message.
Use case resumes at step 1.
-
-
1b. There exists no such macro.
-
1b1. VISIT shows an error message.
Use case resumes at step 1.
-
Use case: View follow-up visits
MSS
-
User starts up VISIT
-
Follow-up visits are displayed
Use case ends.
Extensions
-
2. No follow-ups are scheduled.
-
2a. VISIT shows no follow-ups.
Use case ends.
-
Use case: View reminders
MSS
-
User starts up VISIT
-
Reminders are displayed
Use case ends.
Extensions
-
2. No reminders are set to show.
-
2a. VISIT shows no reminders.
Use case ends.
-
Use case: Open Appointments "Message of the Day" Window
MSS
-
User requests to open Appointments Window
-
Appointments Window opens with Follow-Up and Reminders listed
Use case ends.
Extensions
-
2. No follow-up or reminders active.
-
2a. Message of the Day window shows no active follow-up or reminders.
Use case ends.
-
Use case: Add a new Follow-up
MSS
-
Precondition: User can see list of patients
-
User requests to add a follow-up for specific patient by index and days count
-
VISIT adds a new follow-up entry into appointments
Use case ends.
-
Extensions
-
1a. No days count is specified.
-
1a1. Default 7 days will be assumed.
-
-
1b. The user does not provide a valid index.
-
1b1. VISIT shows an error and help text. Use case resumes at step 1.
Use case ends.
-
Use case: Add a new Reminder
MSS
-
User requests to add a reminder with description and days count
-
VISIT adds a new reminder into appointments
Use case ends.
Extensions
-
1a. No days count is specified.
-
1a1. Default 7 days will be assumed.
-
-
1b. The user does not provide a description.
-
1b1. VISIT shows an error and help text. Use case resumes at step 1.
Use case ends.
-
Use case: Deletes an Appointment
MSS
-
User requests to delete an appointment with a given description
-
VISIT removes any appointment matching the given description
Use case ends.
Extensions
-
1a. The user does not provide a description.
-
1a1. VISIT shows an error and help text. Use case resumes at step 1.
Use case ends.
-
Use case: Sorting Appointments
MSS
-
User requests to sort the list of appointments
-
VISIT sorts the appointments and updates the display
Use case ends.
Appendix D: Non Functional Requirements
-
Should work on any mainstream OS as long as it has Java
11or above installed. -
Should be able to hold up to 1000 persons without a noticeable sluggishness in performance for typical usage.
-
A user with above average typing speed for regular English text (i.e. not code, not system admin commands) should be able to accomplish most of the tasks faster using commands than using the mouse.
Appendix F: Instructions for Manual Testing
Given below are instructions to test the app manually.
| These instructions only provide a starting point for testers to work on; testers are expected to do more exploratory testing. |
F.1. Launch and Shutdown
-
Initial launch
-
Download the jar file and copy into an empty folder
-
Double-click the jar file
Expected: Shows the GUI with a set of sample contacts. The window size may not be optimum.
-
-
Saving window preferences
-
Resize the window to an optimum size. Move the window to a different location. Close the window.
-
Re-launch the app by double-clicking the jar file.
Expected: The most recent window size and location is retained.
-
F.2. User Interface
-
Typing Commands
-
Click on the Command Box with the text “How may I help you?”
-
Type in any Command (i.e. Adding a person)
-
Hit Enter on the keyboard Expected: The command should have been successfully entered and the application responds appropriately.
-
-
Using Help
-
Press the F1 key on your keyboard; Alternatively, click on the Help menu bar at the top of the application and select the Help menu item.
Expected: The Help Window should appear as a new window.
-
F.3. Adding a patient
-
Adding a patient to the list
-
Test case:
add n/Sam Strand p/90811019 e/strandingdeath@gmail.com a/Blk 09 Piccadilly Road #14-137 t/fatigue
Expected: A patient named Sam Strand should be added into the list with his phone number, email and address. He should also have a tag that says fatigue in the list.
-
F.4. Deleting a patient
-
Deleting a patient while all patients are listed
-
Prerequisites: List all patients using the
listcommand. Multiple patients in the list. -
Test case:
delete 1
Expected: First patient is deleted from the list. Details of the deleted patient shown in the status message. Timestamp in the status bar is updated. -
Test case:
delete 0
Expected: No patient is deleted. Error details shown in the status message. Status bar remains the same. -
Other incorrect delete commands to try:
delete,delete x(where x is larger than the list size)
Expected: Similar to previous.
-
F.5. Adding a visit report
-
Adding a visit report to a person while all persons are listed
-
Prerequisites: List all persons using the
listcommand. Multiple persons in the list. -
Test case:
addvisit 1
Expected: Empty form displayed. After saving the form by pressing the Save button or F2, successful save with person details shown in status message. If the person has no previous records or has a Most recent visit date displayed earlier than the current date, Most recent visit date will be updated to current date in the Person card. -
Test case:
addvisit 1 v/12/12/2012
Expected: Similar to previous -
Test case:
addvisit 1 v/invalid
Expected: Error message displayed -
Other incorrect addvisit commands to try:
addvisit,addvisit x(where x is larger than the list size),addvisit x v/dd/mm/yyyy(where x is valid person index and dd/mm/yyyy is an invalid date e.g 30/02/2019 or date with valid day and month but with year not conforming to 19xx or 2xxx format)
Expected: Similar to previous.
-
F.6. Editing a visit report
-
Editing a person’s visit reports for chosen person are listed
-
Prerequisites: List all reports using the
editvist [PERSON_INDEX]command. -
Test case:
editvisit 1 i/1
Expected: Form pops up. After saving the form by pressing the Save button or F2, successful save with person details shown in status message. -
Test case:
editvisit 1 i/0
Expected: No form pops up. Error details shown in the status message. Status bar remains the same. -
Other incorrect delete commands to try:
editvisit,editvisit x(where x is larger than the person list size)editvisit x i/y(where x is is valid person index and y is an invalid report index)
Expected: Similar to previous.
-
F.7. Deleting a visit report
-
Deleting a report while all visit reports for chosen person are listed
-
Prerequisites: List all reports using the
deletevisit [PERSON_INDEX]command. -
Test case:
deletevisit 1 d/1
Expected: First report is deleted from the list. List of reports updates. If the patient has no more reports after deleting, list of reports closes and window prompt of patient having no past records shows. -
Test case:
delete 1 d/0
Expected: No report is deleted. Error details shown in the status message. -
Other incorrect delete commands to try:
deletevisit,deletevisit x(where x is larger than the list size),deletevisit x i/y(where x is is valid person index and y is an invalid report index)
Expected: Similar to previous.
-
F.8. Viewing and Exporting a Patient’s Profile
-
Opening the ProfileWindow
-
Prerequisites: List all persons using the
listcommand. Multiple persons in the list. -
Test case:
profile 1
Expected: Profile panel for the first Patient is shown on the screen. Details of the Patient should be accurately displayed as well, with all attributes (Name, Phone, Address, etc.), as well as Visit Reports shown. -
Test case:
profile 0
Expected: No profile panel is shown. Error message detailing an invalid command. -
Other incorrect profile commands to try:
profile,profile x(where x is larger than the list size)
Expected: Similar to previous.
-
-
Generating a Patient’s Profile in a .txt file
-
Prerequisites: A ProfileWindow detailing a valid user is currently shown and in focus.
-
Press
por the Generate Profile File button -
Expected: A success message is shown next to the Generate Profile File button and the patient’s file is generated in the generated_profiles folder of VISITapp.jar. The filename should be according to the following format: “NAME_PHONE_DATE TIME.txt”.
-
F.9. Appointment System
-
Adding a Reminder
-
Test case:
reminder Test
Expected: A new reminder with the description “Test” is created with 7 days remaining. Appointments panel is updated to reflect the new reminder. -
Test case:
reminder Test d/3
Expected: A new reminder with the description “Test” is created with 3 days remaining. Appointments panel is updated to reflect the new reminder. -
Test case:
reminder
Expected: No reminder is created. Error details shown in the status message. -
Test case:
reminder Test d/-1
Expected: No reminder is created. Error details shown in the status message.
-
-
Adding a Follow-up
-
Prerequisites: List all persons using the
listcommand. Multiple persons in the list. -
Test case:
followup 1
Expected: A new follow-up with the patient in Index 1 is created for 7 days’ time. Appointments panel is updated to reflect the new follow-up. -
Test case:
followup 1 d/3
Expected: A new follow-up with the patient in Index 1 is created for 3 days’ time. Appointments panel is updated to reflect the new follow-up. -
Test case:
followup
Expected: No follow-up is created. Error details shown in the status message. -
Test case:
followup 1 d/-1
Expected: No follow-up is created. Error details shown in the status message.
-
-
Sorting Appointments
-
Prerequisites: Multiple appointments in the list.
-
Test case:
sort
Expected: Appointments in the list are sorted according to type, then days, then text.
-
-
Removing Appointments
-
Prerequisites: Reminder named “Test” and Follow-up named “Satya Nadella” in the list.
-
Test case:
removeappt Test
Expected: Reminder “Test” is removed. Appointment panel is updated to reflect the deletion. -
Test case:
removeappt Satya Nadella
Expected: Follow-up “Satya Nadella” is removed. Appointment panel is updated to reflect the deletion.
-
-
Show Message of the Day
-
Prerequisites: Multiple appointments in the list.
-
Test case:
show
Expected: Message of the Day panel appears with Appointment list.
-
F.10. Creating, deleting, listing and using aliases
-
Creating an alias
-
Test case:
alias l/ls v/list
Expected: A new alias is created, mappinglstolist. -
Test case:
alias l/a v/list
Expected: A new alias is created, mappingatolist, overriding the existing default mapping ofatoadd. -
Other incorrect alias commands to try:
alias potato,alias l/x v/alias(where x is an existing non-aliased command)
Expected: No alias is created. Error details shown in the status message. Status bar remains the same.
-
-
Deleting an alias
-
Prerequisites: Have an existing alias mapping of
atoadd, but no mapping ofpotatoto anything. -
Test case:
unalias a
Expected: The existing mapping ofatoaddwill be deleted. -
Test case:
unalias potato
Expected: No alias is deleted as there is no existing alias with the namepotato.
-
-
Using alias
-
Prerequisites: Have an existing alias mapping
followtofollowup 1, mappingfollow14tofollowup 1 d/14and list at least one person using thelistorfindcommand. -
Test case:
follow
Expected: A new follow up is created for the first person in the list with the default days of 7 days. The appointments panel will also be updated with the new appointment. -
Test case:
follow14
Expected: A new follow up is created for the first person in the list with the specified input of 14 days. The appointments panel will also be updated with the new appointment. -
Test case:
follow d/30
Expected: A new follow up is created for the first person in the list with the specified input of 30 days. The appointments panel will also be updated with the new appointment.
-
-
Listing aliases
-
Prerequisites: Only have an existing alias mapping of
atoadd. -
Test case:
aliaslist
Expected: List of aliases panel is shown on the screen. All existing user-defined aliases are shown.
-